

Bordfunker
-
Posts
1,005 -
Joined
-
Last visited
-
Days Won
17
Content Type
Profiles
Forums
Blogs
Gallery
Downloads
Store
Events
Posts posted by Bordfunker
-
-
Ahebron, now you’re just taking the Micheal!
As it was I managed to find an engine hoist locally, less than 3 miles away, so all is good.
I’ll post an update later today, once I have taken some photos.
Pete, thanks for the confirmation on the fixings, though I still think it looks a complete buggers muddle!
Karl
-
Thanks for the comments guys.
The inside of the wiper gearbox has been thoroughly greased, with fresh, non-lumpy grease, Josef, so should be good for a few more years.
Mark, many thanks for the offer, but Eastbourne might be a bit of a trek, but thanks all the same.
Paul, sounds like I just need to eat my Shredded Wheat and set about the pedestal.
Thanks all
Karl
-
 1
1
-
-
The last couple of weeks have been spent doing what our American cousins refer to as tearing down, or in the Queen's English, disassembly.
When I took the bulkhead off the chassis a few weeks back, I removed the wiper motor and rack assembly, initially with the aim of just storing them, but one look at the state of it all, made me change tack, and decide to give everything a spruce up before it was all packed away.
But then I got carried away......
I went to split the rack from the wiper motor, which meant opening it up, which in turn revealed grease the colour and consistency of ear wax.
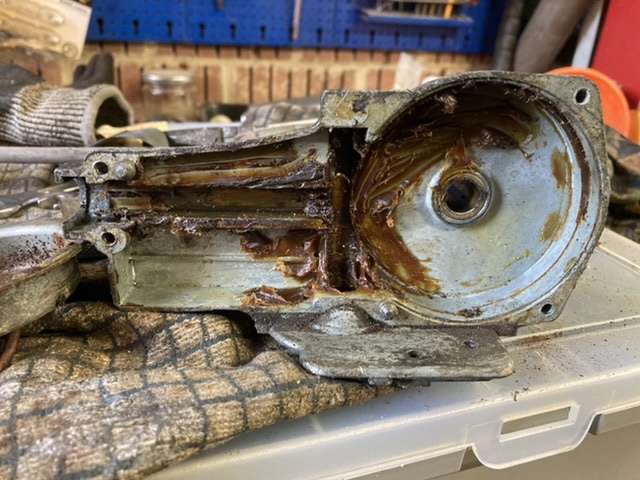
This is after a partial scraping out!
The motor body didn't look any cleverer either....
And the interior showed signs of water ingress.
Nothing for it, but bath time.
Did I mention that it was a bit grubby?
I then spent the next 10 days cleaning, priming, and painting the cleaned up assemblies, leaving me with this to go into storage.


I didn't go overboard on cleaning up the allow castings, after all I don't own a vapour blaster.
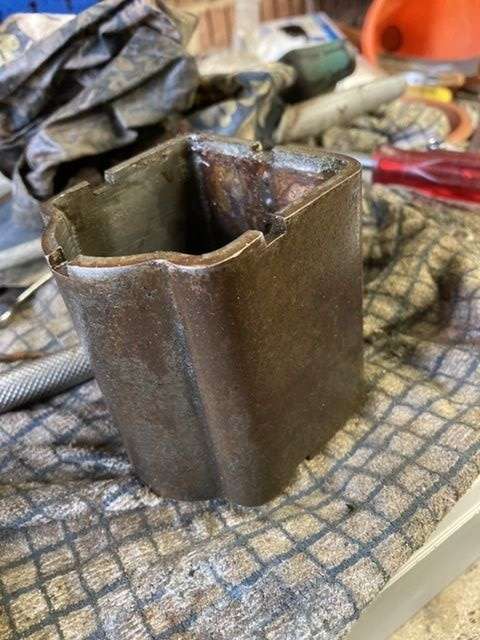
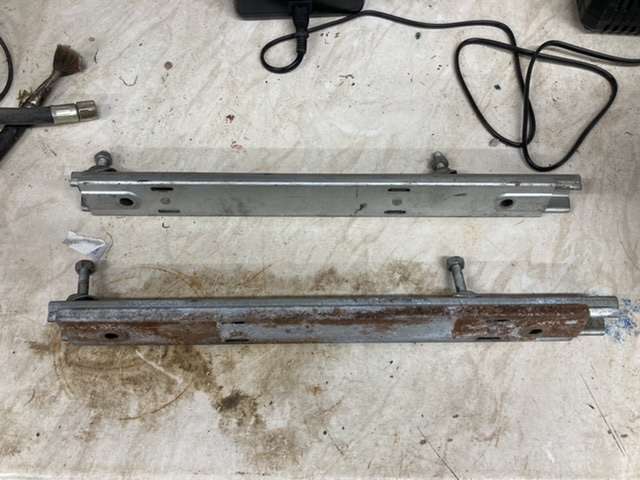
The gearbox rear mount also got the same treatment, going from this...
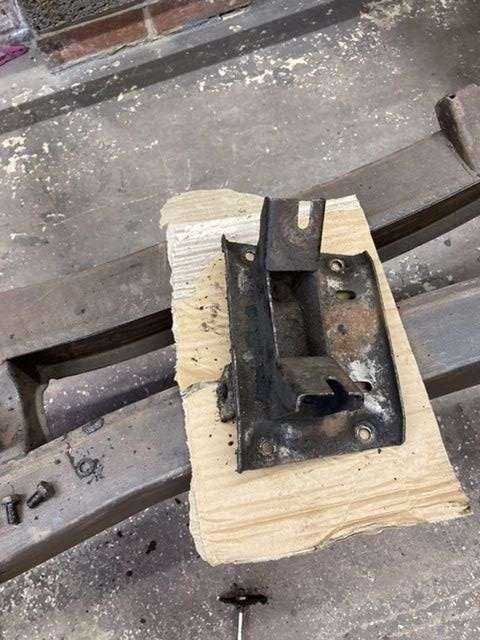
....to this...
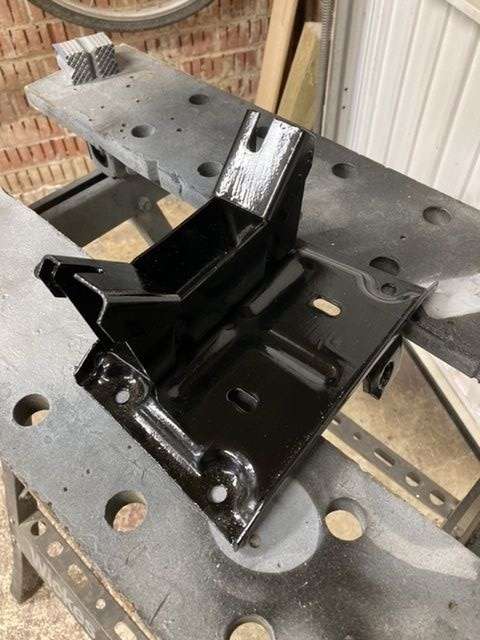
Again, I didn't fancy putting it away in a state, and its a nice feeling knowing that these parts are ready to back in when the time comes.
Back to the tearing down, sorry, disassembly, I started removing the ancillaries from the engine, ahead of taking the engine out.
The manifold came off with no issues, which was a relief, as did the water pump, an even bigger relief.
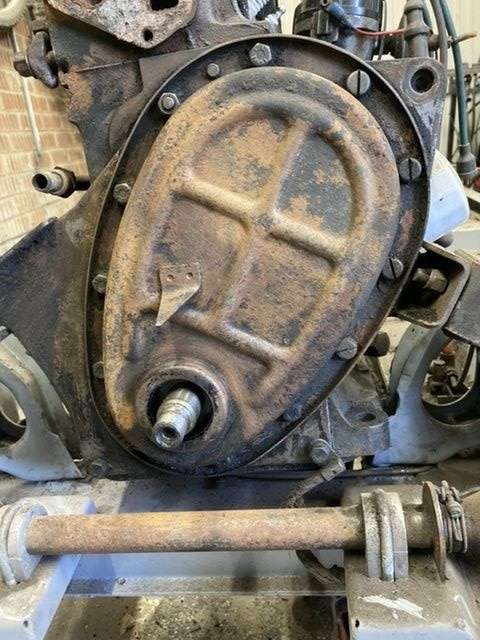
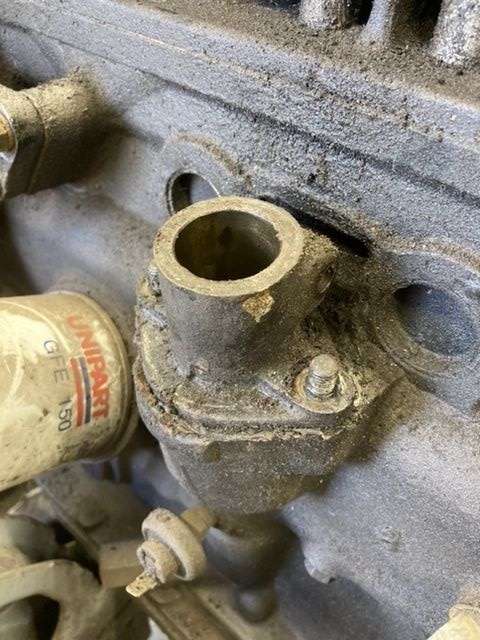
The timing cover oil seal has been leaking for years, so before I removed the flywheel, I locked it up, and cracked the front pulley nut.
All that oil, and none of it protected the rest of the timing cover, leaving it decidedly scabby.
Also, is the motley collection of, nuts, bolts, and cheese head screws holding on the timing cover normal?
The flywheel and backplate came off without much of a fight, despite my initial challenge with getting the freshly unbolted flywheel to release from the crank.
Looking at that shiny core plug, I have a suspicion that someone has been here before me, and not that long ago, judging by the pristine condition of the aforementioned plug.
Pity whoever it was, didn't also take the time to replace the rear crank seal, as that has obviously been leaking for a long time given the state of the backplate.
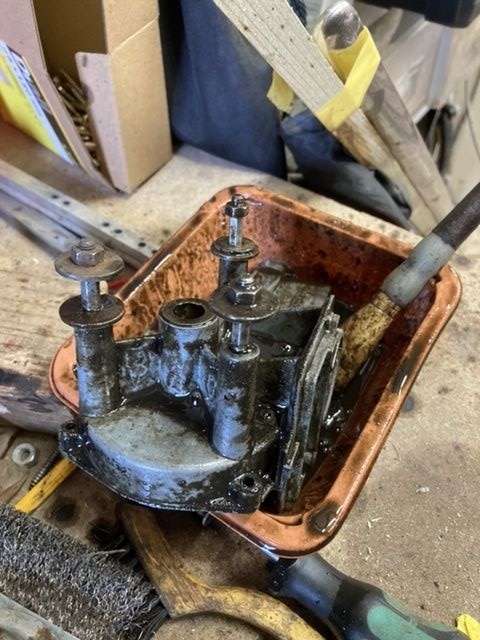
The dizzy, like everything else on this car was covered in a thick film of oil and muck, but responded to a quick brushing with Gunk, and an enthusiastic wipe down.
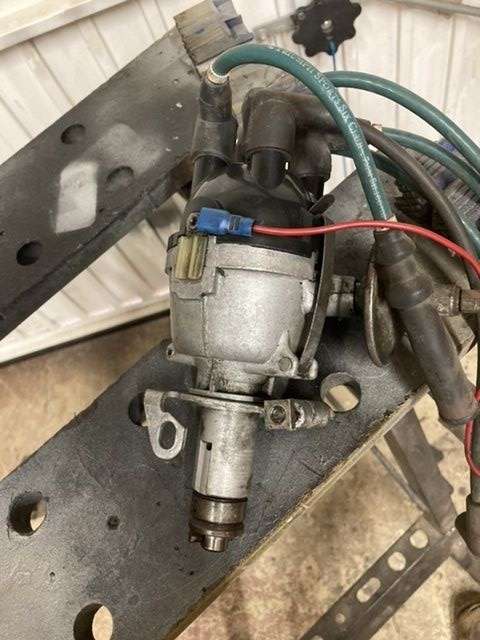
Which also revealed what looks like evidence of a minor conflagration!
Not sure what happened there, but it always worked before I took the care apart, so no harm, no foul.
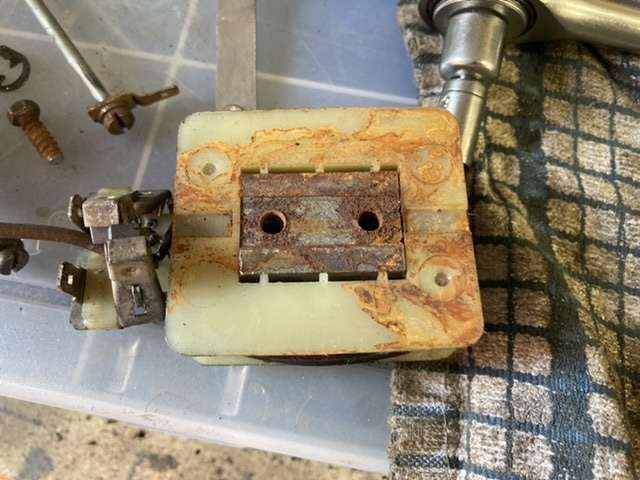
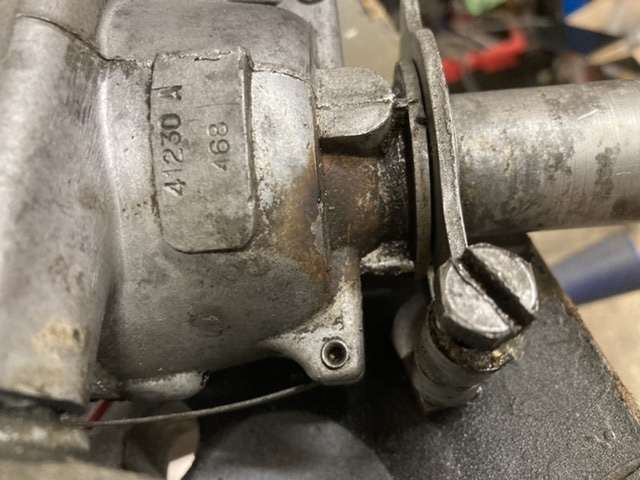
The workshop manual suggests that the dizzy pedestal can be removed by removing the two nuts either side.
Except mine won't budge!
Am I missing something, or, as I suspect, is mine simply glued on by what looks to be a thick wodge of sealant?
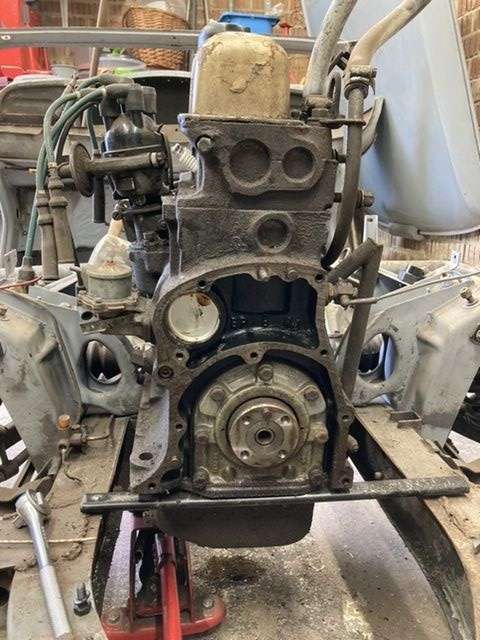
All of which has left me with a relatively bare engine......
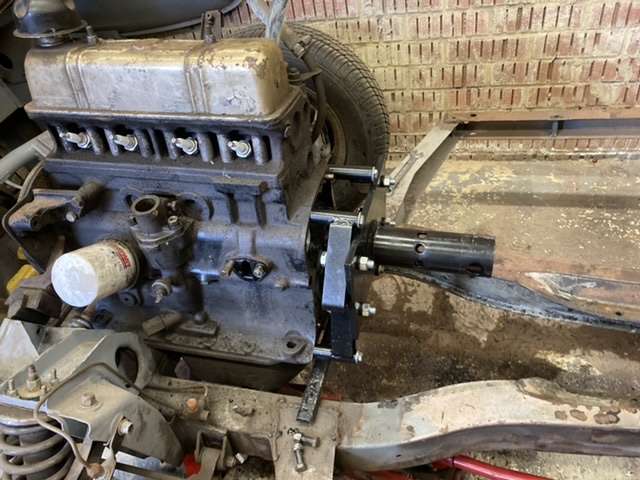
Looking a little naked now, and with the engine stand mount bolted in place.
I did try lifting the engine, with the help of my youngest son, all 6'3" of him, but given that I am currently working on a health and safety project at work, and the plethora of slip and trip hazards around the engine, I decided not to attempt it.
So this week I need to find an engine hoist.
Overall a very productive weekend, even if did tip a container of Gunk over myself, leaving me looking like a hobo who had wet himself!
Karl
-
I thought you’d stolen a shopping trolley there!
Fortunately I have an engine stand ready to go.
Karl
-
Pete, the back plate is perfectly flat thankfully, having checked it with a straight edge.
Hopefully my 6’3” youngest son is up to job of helping me move the engine.
Karl
-
Thanks all!
Just trying to work out if it’s worth hiring an engine hoist, given that the engine only has to move about 2 feet to the engine stand.
I think a trial might be in order, but first I will need to replace the rear oil seal as that has clearly been leaking for some time.
Karl
-
Thanks guys.
Sod’s law, posted on here while having a coffee, went back out, and gave it a wiggle, and it moved, which it hadn’t before!
A couple of gentle taps with the mallet, and off it came.
So problem solved.
Next question, how heavy is a Herald engine, minus water pump, manifolds, flywheel and alternator?
Could 2 adult men lift it safely?
Thanks
Karl
-
Need advice from the hive mind on best way to remove the flywheel from my Herald 1200, and yes I have removed the 4 retaining bolts!
Is there a knack to this, or some specific procedure required?
Thanks
Karl
-
The wing to wheel arch flanges on the rear of my Herald were in a similar state, rough around the edges, but with 95% of the panel in good nick.
I ended up replacing the edges in small sections, and replacing the rear wing around the arch only, as I could bring myself to trash the otherwise good wing.
Karl
-
Just kidding Colin!
I think I’ll go with the existing clutch for now, particularly as it was fine before I dismantled the car.
Not a lot to report this week as I spent the weekend cleaning up a number of the parts that came off the car, before I move onto the engine.
Karl
-
On 12/06/2022 at 22:39, johny said:
Not even a lever bush kit required on the gearbox?
Given the quality of the modern replacements, I’m inclined to leave as is, as mine didn’t rattle when I took it off the road.
On 13/06/2022 at 12:59, Colin Lindsay said:I'd replace the clutch, in any case. It might be additional expense but it's peace of mind for a few more years.
We’re not all as flush as you Colin!
")
Thanks Rob and Pete, I’ll give it a clean up, and then put them away for even the engine gearbox are reunited.
The socket has now turned up for the front pulley nut, now is this clockwise, or counter clockwise to remove?
Karl
-
With the car stripped down to just chassis, engine, gearbox and front suspension, the next step was going to be removing the gearbox.
With the body off, it's not exactly a difficult task, but one that did turn out to be quite messy due to decades of leaking oil.
The gearbox itself came out without a fight, not surprising really considering that all of the nuts and bolts had been soaking in oil for 50 years, and it was soon sitting on my deluxe gearbox handling dolly!
Actually my old welding trolley, but as needs must.
You can see the state of the top of it, it was completed clarted up with old oil and grease, along with 54 years of general road muck.
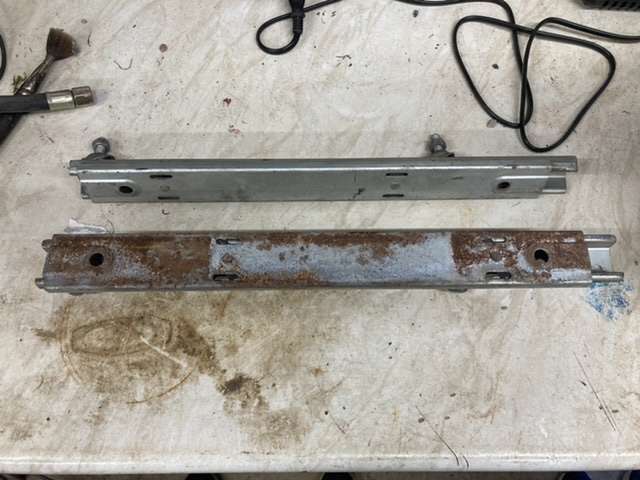
This is what I scraped off the insides of the chassis rails either side of the gearbox.
This was the rear gearbox mounting plate, both covered in oil, and rusty, all at the same time!
How did Triumph manage that?
The clutch looked to be relatively new on first inspection, and that would certainly appear to be the case once it was removed from the car for inspection.
The flywheel also appears to be in good nick too.
All of which was good news, as I was half expecting to renew the clutch.
The same could not be said for the bushes on the gearbox restraining assembly, which are definitely well beyond their use by date.
I then set about cleaning up the gearbox, with a combination of wire brushing and a bit of Gunk stippled on with a brush.
A marked improvement, though I still need to drain the oil before I can tackle the underside.
Having said that, a lot of the oil appears to have come down from the rear corner of the engine, so I am assuming the usual Herald head leak, which has steadily been oozing oil over the back of the engine and gearbox for many a year.
I know that the rear gearbox extension seal has failed, so have a spare in the stash, along with a fresh set of gaskets for the rest of the box.
And yes I did slacken off the prop shaft flange retaining nut before removing the gearbox.
Other than that, I won't be touching anything mechanical as it was working fine last time I drove it, so best left untouched.
Next step is the engine, but I am currently waiting on a suitably sized socket to remove the front pulley nut. I did order one last week, but it has yet to appear, I feel a phone call coming on.
I do though have to find somewhere local to hire an engine hoist first, so again phone calls are in order this week.
And that was it. The sum total of my few hours in the garage this afternoon.
I am looking forward to getting the engine and front suspension out and off, and then getting back to completing all the chassis welding.
Karl
-
9 minutes ago, Badwolf said:
Still have my leather peaked cap. The one that I was ridiculed for a couple of months ago!!
This sort of thing...

Oooh! Peaky Blinder!
-
 1
1
-
-
I see what you mean about the wiring!
That’s a real rats nest behind the battery.
Still pretty much par for the course given the age of the car.
Karl
-
Colin, you need to get yourself a nice Panama hat.
Karl
-
2 hours ago, ahebron said:
Is that a rare Forward Control Herald I spy?😉
Funnily enough, I had the very same thought. Not sure what that would do to the weight distribution over the rear wheels though!
Josef, thanks for the heads up. I might just keep an eye out for decent second hand ones if that is the case.
Paul, see link below;
https://www.machinemart.co.uk/p/5-piece-car-trim-removal-kit/
They do also sell a bigger set, but this one looks to be sufficient for older vehicles like ours.
Karl
-
 1
1
-
-
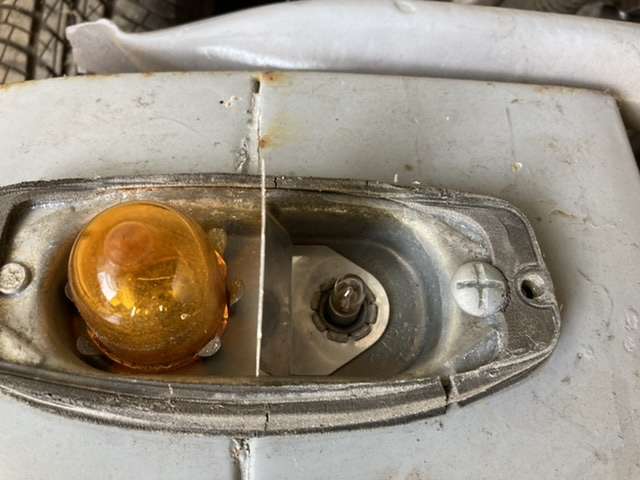
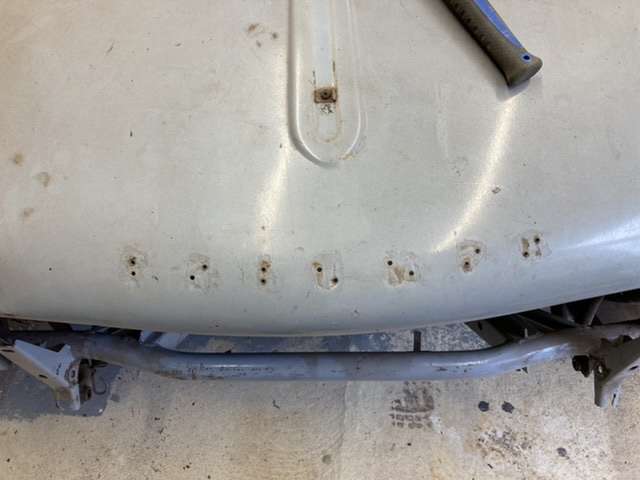
With the bonnet no longer attached to the rest of the car, I decided to remove the lights and trim before actually removing it, just to try and avoid damaging anything in the process.
The lights are a bit tired, and new chrome rings are definitely required, but for now they have been packed away, carefully wrapped up in bubble wrap for now.The side lights are in a similar state, if not slightly worse, note non-standard screw in the pic below.
I also removed the stainless steel bonnet centre, and side trims, as these are still in good nick using my newly acquired trim removal tools.
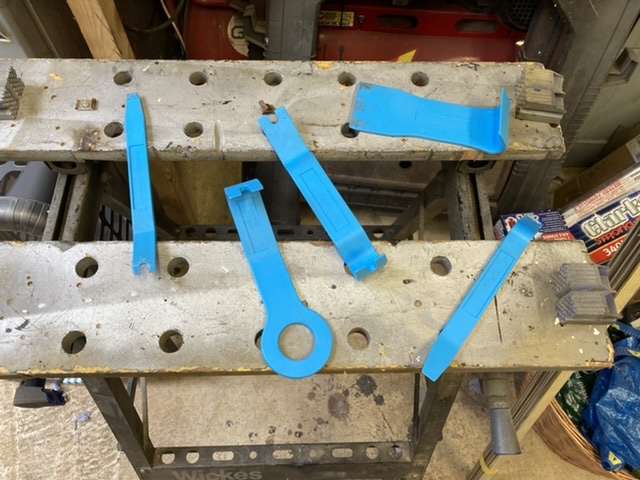
These were £11, and I can thoroughly recommend them, as they made removing the trim strips etc a doddle.
Allowing me to tape them all up to a straight batten for protection.
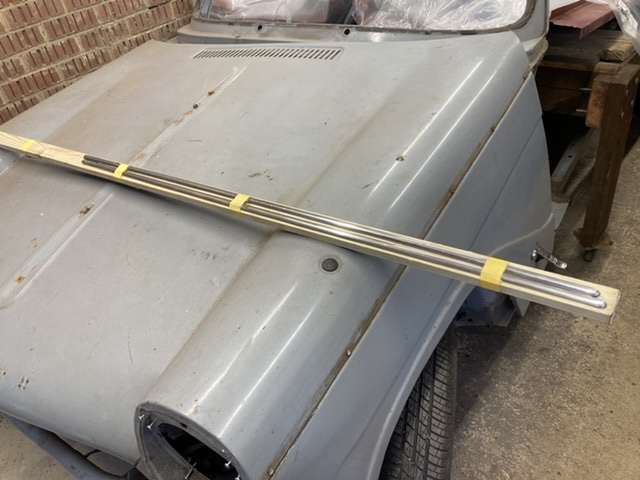
Now to find somewhere safe to store them!
I also did the bonnet letters, though some of these may be beyond saving to be honest.
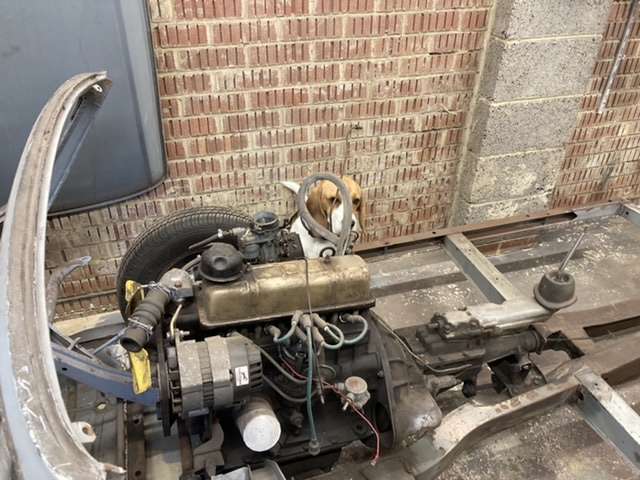
With that out of the way, my youngest son gave me a hand to remove the bonnet, quickly followed by the bulkhead itself.
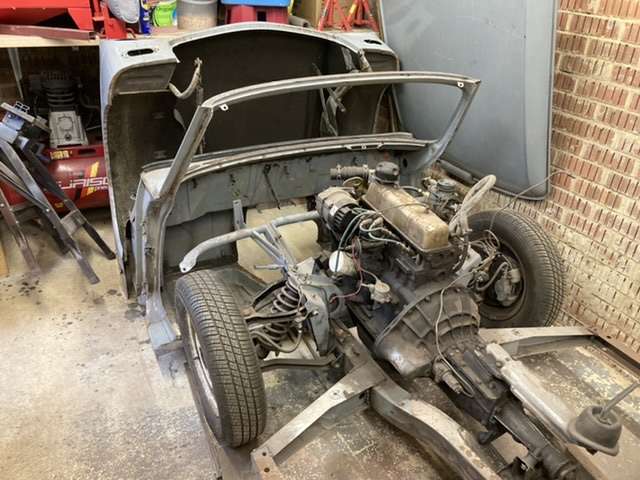
Hey presto!
I even had some help from Olive!
That’s it for this weekend.
Next weekend I need to take a look at removing the nut on the front of the crank shaft.
Now is that clockwise, or anti-clockwise to remove?
Karl
-
Liking the little alloy wheel with the leather rim, though to my mind it says Spitfire rather than Herald, even a convertible one.
Karl
-
12 hours ago, Badwolf said:
Karl - Whatever you do, now that you have light, don't start looking for more rust!! Good to see that you're still on the case.
Bare in mind that I still need to sort out the bulkhead, and that is a veritable treasure trove of rust.
After that, I am not sure that there is anywhere else rust could be hiding, I’ve had everything else apart!
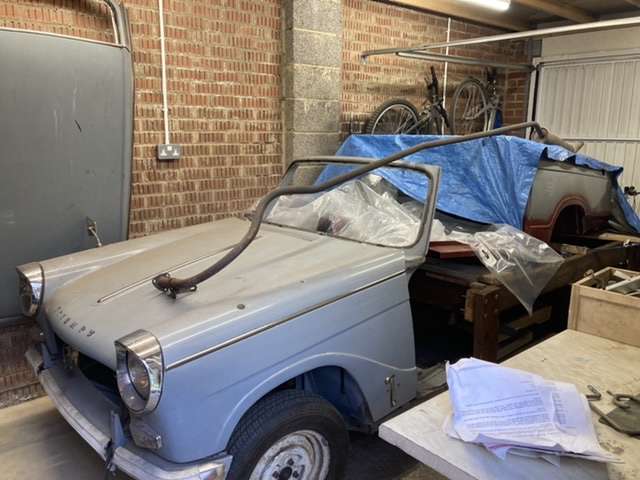
The bonnet is unbolted ready for removal tomorrow, after which the bulkhead will be next off.
Karl
-
I hadn’t realised that I haven’t posted an update in over 3 months, but it has not been for want of activity in the garage, however that activity hasn’t been focussed on the Herald, but the garage itself.
So what have I been doing for the last 3 months?
Aside from work, which to be fair has taken the bulk of the three months, I had a week in Cornwall with Mrs B and our two youngest.
Magically, Mrs B managed to pick a week when the weather was perfect.


Prior to this I had been welding up the ends of the main chassis rail, but was struggling with both access and lighting, so decided to take a step back and think about what was really needed.
The lighting in the garage has always been marginal, with just a single bulb, and therefore it made sense to address this with a proper lighting set up, that would allow me to see what I was welding!
But seeing as that would require an electrician, Mrs B suggested we go the whole hog, and get a proper power supply off the mains rigged up, which would then allow the luxury of more than 2 plug sockets.
Fortunately the estate that I live on has a very good Facebook page, so I was able to ask for recommendations for a suitable electrician.
In typical procurement fashion I went with the 3 bids and a buy approach, and soon had 3 electricians booked to provide quotes, which they all duly did, and which were all very close in both cost and method.
Obviously I went with most expensive quote, not because I think expensive equals better, but because I just liked the guy’s approach, which saw said electrician duly booked for early May.
Which then meant I needed to get the rest of the garage sorted out, starting with properly boarding out the loft, which took a lot longer than anticipated, and which I only managed to finish off today.
So that is what I have been up to, but what does it actually look like?
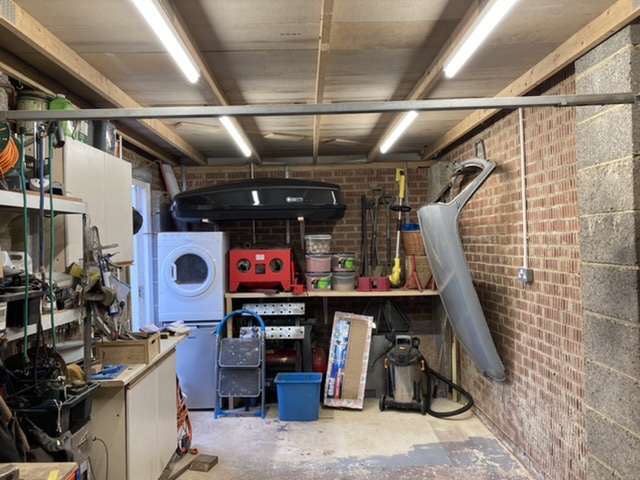
Look at that, actual light!
Benches still need tidying, and there’s a box of crap that I forgot to take to the tip, but definitely better as I can actually work at the bench and see what I’m doing!

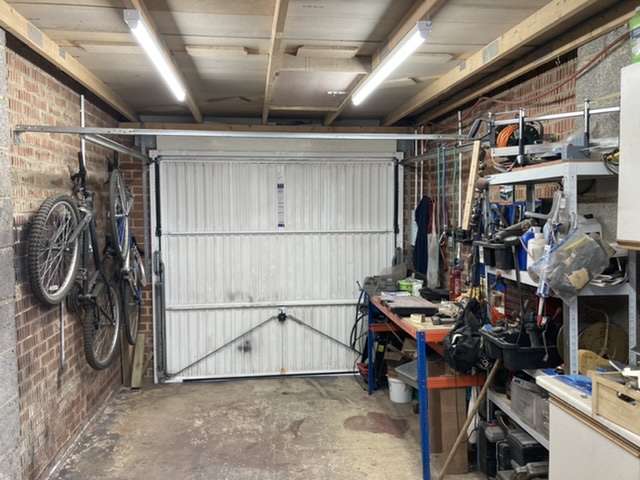
And the reason for all the effort lurking on the drive.
It’s still a tight fit, but there is now room in front of the car and behind, which means I can get on with the next stage, removing the bonnet and bulkhead, followed by the engine and gearbox.
The aim is to strip it back to the bare chassis, which I can then flip, stand up, roll over, allowing access to weld it more comfortably.
There’s an engine stand ready to receive the engine, but the only work I plan on doing to it is a thorough clean up, and replacement of the front and rear oil seals as I know they are leaking.
Likewise the same for the gearbox, though quite possibly a new clutch will go in white the two are apart.
So that’s the plan for the next month or two.
Karl
-
3
-
-
1 hour ago, Badwolf said:
Karl - Where have you been. Hope things are ok with you and family. Missed your updates.
I’ve been busy in the garage, just not working on the Herald.
The garage has been getting a bit of an upgrade, hence the sort out of miscellaneous parts.
Should be an update shortly.
Paul, that makes sense on the dynamo bracket. I’ll put that to one side, along with the adjuster bracket, just in case I one day lose my marbles and decide to revert to a dynamo.
Sulzerman, thanks for that. I’m assuming a PO was thinking about upgrading the seating.
Thanks all
Karl
-
Having a sort out in the garage at moment and came across some parts that came with the car, but weren’t fitted.
First up are these seat runners, there are 2 pairs.
Not sure what they are off, but if anyone wants them they are welcome.
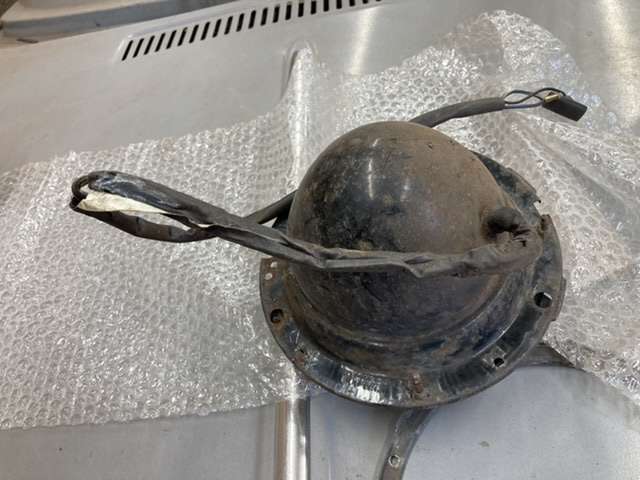
This is the real mystery part, as I haven’t a clue what it is.
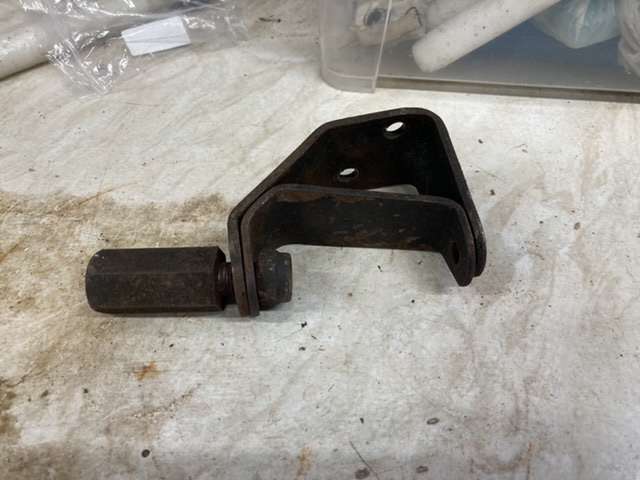
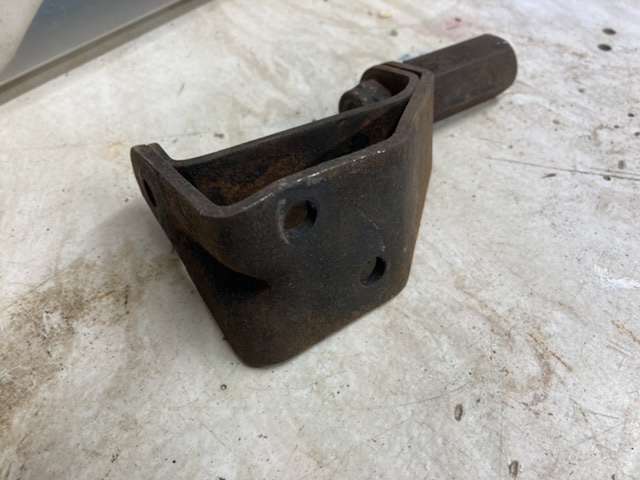
Not sure if this was related to the dynamo that my car was originally fitted with, but I already have the pivot arm for that.
Thanks in advance.
Karl
-
Great progress there Colin!
Looking forward to seeing how you resolve that bonnet fit issue.
Karl
-
Colin, great job on the bulkhead painting, it looks stunning.
I’ll have to take a look at Trev’s blog, it looks very interesting.
Karl
-
1
-


** 26/02/23 Heading Up ** Probably how not to restore a Herald!
in My Triumph Restoration Project
Posted
Colin, thanks for the diagram.
I have taken pictures as well so that I have a record of what was where before I get around to removing the timing cover.
As per my earlier post, I managed to find an engine hoist locally, which came as a bit of a surprise as most of the local hire places don't list these on their websites.
I remember in the 80s there always engine hoists outside hire shops, but then I guess we were all a lot more prepared to perform engine swaps on our life expired cars than today, where the focus looks be more on adding bling.
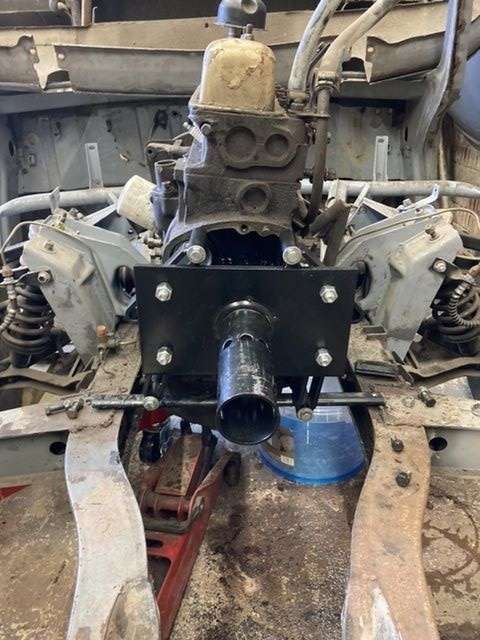
When I removed the alternator and water pump, I had also removed the lifting eye on the front of the engine, so had to go digging in the spares box for a short bolt with which to attach the eye.
Nothing quite fitted, so I used what I had, and added a bunch of body mounting washers to create some clamping force.
This was followed by an introduction to Mr Engine Hoist.....
For what is a fairly large piece of kit, I was surprise at how easy the hoist was to manoeuvre, even with the engine attached.
This was after I had remembered to unbolt the earthing strap between the engine and the chassis!
I'd be lying if I didn't say I was a little concerned at having my engine dangling in space, as this is the first time I've done this, but everything went OK.
Which just left me to swing the engine across, and onto the waiting engine stand.
The engine is definitely in need of clean up, but that will have to wait.
Again I raided the spares box, or more precisely the box of body mounting bolts, to attach the engine to the stand, but given that slots in the stand were bigger than the bolts, I sleeved the bolts with some sections of steel tubing that I had recovered from an old stair gate.
I hadn't drained the oil before I took the engine out, so now was the time to do so, but without the ability to run the engine to thin the oil, I needed another heat source.
Cue 15 minutes of playing the heat gun on the underside of the sump, at all times under close supervision, as the last thing I wanted to do was start a fire in the garage.
And this is what came out, more like a gritty sludge than oil. I left the heat gun running for a few minutes after the plug was removed, as well as tilting the engine over on the stand to get the last dregs out.
With the engine drained I moved on to removing the front suspension, after I had reminded myself of the correct procedure. It's amazing what you forget when you have spent most of the last few years welding rather than wielding a spanner.
Everything that has come off the chassis has been cleaned and labelled, most of it having been refurbished when I first got then car.
Leaving me with a stripped, but very mucky chassis, so out with the Gunk and the pressure washer, and the chassis got wheeled out onto the drive.
I gave the chassis a quick going over with the heat gun to dry it out, before popping it on the dolly and wheeling it back into the garage.
Next week should see me get back to the welding, grinding back all my original welds, which are all highly suspect given:
Because the chassis can now be stood up, flipped over, or simply laid flat, the welding should be a lot easier, and therefore faster, especially the bit about not having to weld upside down.
I'm classing that as a successful weekend, with just the hoist to be returned in the morning.
Karl