

SixasStandard
-
Posts
395 -
Joined
-
Last visited
-
Days Won
7
Content Type
Profiles
Forums
Blogs
Gallery
Downloads
Store
Events
Everything posted by SixasStandard
-
Thanks Pete.
-
That's a very nice job Paul........and as per Colin's comment I'll be copying your cable clip........a nice neat solution. Ian
-
Hello Adrian, Good to hear that NZ is starting to return to normal, and also that your work situation is so positive. What you said about the progress you've made on your car struck a chord with me, as I'm sure it has with many others on the Forum. The lockdown in the UK has coincided with unusually good weather, and for those of us with a small single garage it made it so much more enjoyable to be able to work on the car out in the sunshine. I personally reckon that I've made at least eighteen months to two years worth of progress on my car in the space of the last three months. All of us have life commitments that reduce the time we can spend on our cars, and which stretch out timescales, so one of the few positives of this current situation has been to drive progress forward quickly, whilst also keeping me occupied and upbeat. It makes you feel a bit guilty when so many others are experiencing the pandemic is such a different way, so I just think myself very lucky. Ian
-
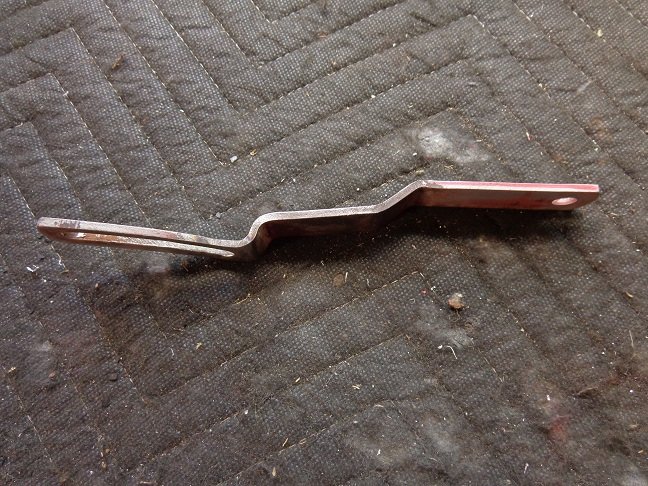
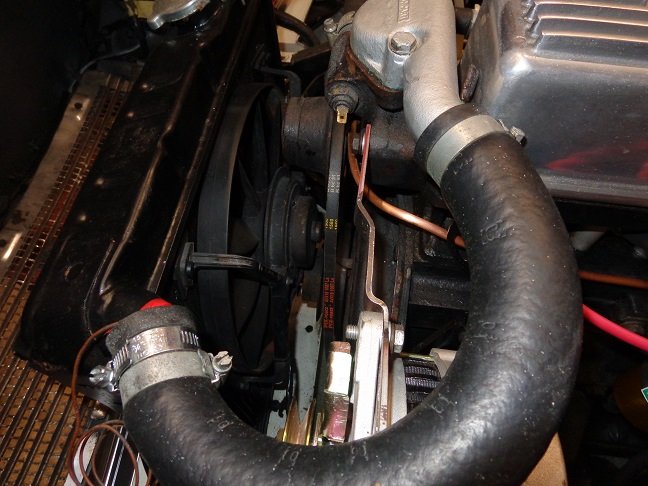
Yes, you're quite right. In this case the level of stress being applied to the bracket should be minimal though, basically just overcoming the tension of the fan belt, so I reckon the mild cranking of the bracket should be ok. To be honest there are better ways of doing the job rather than the approach I took, but with limited materials available to me I just used what I had in the shed. The picture below shows the issue I had with the pulley vanes, necessitating the extra back step to line up with the rear face of the top lug. With the alternator oriented more vertically I could have used a straight strut, but with a lot less available adjustment. I was a bit tetchy yesterday........hopefully no-one noticed. Ian

-

Additional dash gauges in Mk1 Vitesse Ashtray
SixasStandard replied to SixasStandard's topic in Electrical System
The dash will definitely need to be cut to allow 52mm gauges to be fitted into the ashtray opening, but in my particular case that isn't a problem, as the ashtray will never be used, whereas the clock, oil pressure gauge and voltmeter that I intend to fit most definitely will. Ian -
If I'd have had a length of tube, a large nut, two spherical joints (one left handed), and a left handed tap I might have gone that route........but I don't.......so I didn't. What's so complicated about modifying the existing dynamo bracket with a couple of bends, a saw cut and a bit of welding???........it wasn't complicated for me.
-
Hello Pete, The existing dynamo bracket already had a 10mm step in it, but mounting from the front would have fouled the pulley vanes, so an extra 10mm step was needed to align with the rear face of the top lug. Ian
-
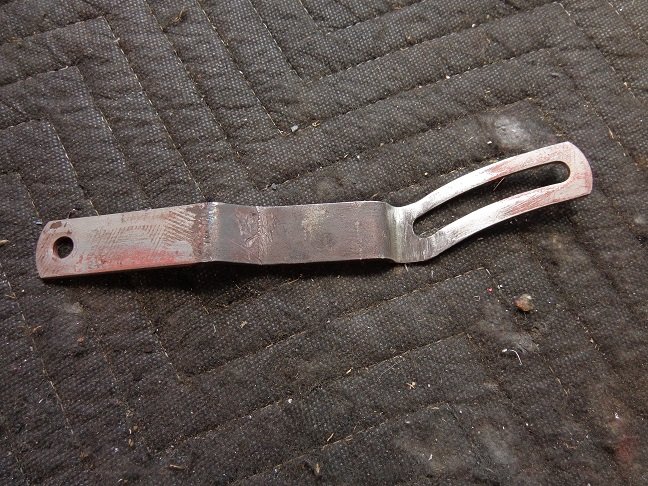
Hello All, Just to update on my progress with the conversion from dynamo to alternator.........I have now had the front spacer shortened to give the correct pulley offset, and fitted a rear stainless steel spacer after first shaving off a few mm from the rear lug bush to ensure that the rear bolt can be locked with a pair of hex half nuts whilst leaving the rear lug with about 0.5mm float. The adjuster bracket I've managed to adapt from the original that was fitted for the dynamo, by adding an extra 10mm rear step back, and then cutting the slotted section off and rewelding it back at an angle after first removing some material ......... look at the before and after pictures to explain better. I found that reversing the adjuster bolt and screwing it in from the year avoided any fouling of the bracket with the alternator pulley vanes. It was a bit of a faff to be honest, but works well and allows enough adjustment to fit a range of fan belts.

-
Additional dash gauges in Mk1 Vitesse Ashtray
SixasStandard replied to SixasStandard's topic in Electrical System
Thanks Bobs67Vit and Colin, The illustration that I saw was definitely a line drawing rather than a photo, and did in fact show 3 gauges........but the photo does prove that this was a period correct modification, albeit one that will require cutting of the dash to fit the gauges as you rightly point out Colin. I hadn't thought to check my copy of the Autobook manual.......that might be the answer!! Thanks again, Ian -
Additional dash gauges in Mk1 Vitesse Ashtray
SixasStandard replied to SixasStandard's topic in Electrical System
Thanks Ben, By coincidence I've just acquired a substantial archive of old Courier copies going back to the early 1990s (thanks Roy!)........so will trawl through them to see if I can find the article you mention. Does anyone know if there is an index anywhere of Courier articles going back that far? Thanks, Ian -
Hello All, Hopefully somebody can save my sanity here........I KNOW that I've seen a period picture of the ash tray on a Mk1 Vitesse modified to fit 3 additional gauges, but I can't for the life of me recall where I saw it, or find it in any of the picture/document archive that I've accumulated. I'm sure that it was a Triumph issued image, and an illustration rather than a photo. Really frustrating, as I'm considering this modification myself, and would be interested in the instructions that were issued in period. Can anyone recall this illustration? or even just where it was published? Any help greatly appreciated. Ian
-
Has your Vitesse got stretch marks?
SixasStandard replied to SixasStandard's topic in Bodywork & Fittings
Had a poke around in the engine bay today, and would you believe it.......my offside side panel is in 3 pieces!! All very neatly done by a previous owner.......and doing the job it was intended to do.......so no reason to change anything at this point, after all it's part of the car's history Ian -
Has your Vitesse got stretch marks?
SixasStandard replied to SixasStandard's topic in Bodywork & Fittings
Thanks everyone for your replies, it's a learning process for me at this stage of my Vitesse ownership, so grateful for all of your insights. From the replies it looks as though the ripples in these plates occur in some original examples, so presumably must have been down to worn press tools or suspect operation .........whilst others are free of any distortion. As to the 2 part adaptation on mine.......the fact that others have this same mod suggests that perhaps it was publicized somewhere as an aid to better access the engine during maintenance? Regards, Ian -
Has your Vitesse got stretch marks?
SixasStandard replied to SixasStandard's topic in Bodywork & Fittings
Thanks Paul/Steve, Looks like someone has sawn mine in half at the thinnest part!! My 'rear' panel doesn't have the louvres either, although mine is the nearside, whilst yours is the offside, so not sure if louvres are supposed to be present on both sides or not. Will check tomorrow, but I'm pretty sure my offside panels have also been cut in a similar manner, so looks to have been done to allow part removal rather than any more nefarious reasons. Thanks for the picture Paul, at least I now know what the staple holes along the trailing edge are for........no rubber edging on my butchered panel either I'm afraid!! Ian -
Hello All, Whilst I wait for some hardware to be delivered for my '68 Mk1 2L Vitesse's Dynamo to Alternator conversion, I've been doing a bit of 'lipstick and powder' work on the engine bay. As part of this I've removed the nearside engine bay side panels, taken them back to bare metal, and I'm currently in the process of repainting them. During all of this excitement I noticed some quite noticeable deformation ripples in the steel of the rear panel, and initially considered that they might have been the result of crash damage. Looking closer though you can see that they follow the lines of stress created by the press tool during manufacture.......so I reckon that they've been there from day 1. I've not whipped off the offside panels yet, so don't know at the moment whether the same ripples appear on that side as well. Just out of interest have any other Vitesse owners observed the same thing on their cars? Coming from an engineering background myself I was quite surprised at the extent of the rippling, which may have been the result of a worn press tool being used well past its sell by date!! Ian

-
Hello Iain, I'm not planning on connecting the period radio to anything........it's just there to give a correct period look. I would play music or radio from a smart phone or Mp3 player, either via BT or direct AUX connection. I'll take your comments about VFM under advisemment. Regards, Ian
-
Hello Andy, This is the solution that I have also opted for with my Vitesse, with my Radiomobile 1085X in the console for purely aesthetic purposes, and in my case a 4 speaker Bluetooth amplifier under the dash feeding 2 speakers in the kick panels and 2 in the rear quarter panels. I currently intend to go for this unit: Hidden Audio :: Hidden Bluetooth Amplifier A bit more expensive, but quality is very good from what I've heard. It also has the added advantage of limiting your risk of having an expensively upgraded period radio pinched. Period radios can still be picked up cheaply (as you found).......so it's a no-brainer for me. Regards, Ian
-
GT6 Chrome (plastic) trim on the door cards
SixasStandard replied to rulloyd's topic in Bodywork & Fittings
Hello Paul, I did buy this chrome wrap with the idea of also trying it out on the bumpers of my Alpine, but in practice I wasn't able to get it to mould around the compound curves of the bumper profile sufficiently to give a good result. That being said, the stuff I bought from E-Bay was at the lower end of the quality scale, and the materials and skills available at professional wrap companies will be of a much higher quality. If I were seriously considering re-chroming bumpers of any classic, and wanted to keep costs down, I would certainly consider dropping in to a local vehicle wrapping company to get a quote. Ian -
GT6 Chrome (plastic) trim on the door cards
SixasStandard replied to rulloyd's topic in Bodywork & Fittings
Hello Rich, You say that the strips are beyond repair, but if you are referring to the chrome surface finish rather than the actual structure of the strip, then there is also the option to cover the strips in chrome wrap film. I know this sounds like a bit of a tacky bodge.......but I tried the stuff to refurbish the chrome front grille on my Sunbeam Alpine, and it turned out really well, and saved me a pot load of money over a replacement grille. It is cheap to buy and would be really easy to apply to simple sections like your trim strips. It's just a case of peel and stick. https://www.ebay.co.uk/itm/Mirror-Chrome-Vinyl-Wrap-Silver-All-Sizes/200973807896?var=500192405902&hash=item2ecaf8f118:g:CnkAAOxyBXNSWDdJ I'm sure that there'll be some scepticism about using this product, but all I can say is that it was ideal for the grille on my Alpine, and I've attached a few pictures to give you an idea of the finished result. Ian


-
Thanks mate, but I've had the 'riot act' read to me.........so I'll be using the existing dynamo bracket with adjustments to the spacers. I appreciate your response though........cheers. Ian
-
You're quite right Pete........I had a 'lazy bugger' moment there!! Now that you've administered the required kick up the backside I've spent some time in the shed with the dynamo, mounting bracket and replacement alternator and actually thought about it (had to sit down at one point as the brain started up from cold). I drew some datum lines on the workbench with pencil and then assembled the dynamo on the mounting bracket and lined it up with the datums, measuring the offset. Using the same dynamo front spacer to attach the alternator and then lining up with the same datums gave me the difference. Basically the alternator pulley sticks out 11mm further forward than the dynamo one. So, the plan is now to get a friend with a lathe to take off 12mm from the front of the spacer, which still leaves enough of the 5/16 UNF internal thread to lock the bolt and a washer down. Same friend will also be 'persuaded' to make the rear spacer, 25mm diameter bar with a 13mm diameter x 2mm step down at one end, 18mm overall length, drilled through with an 8mm thread clearance hole for a 75mm long M8 bolt. As for the adjuster bracket........I'm thinking of using a stainless steel rigging screw......... 8mm Stainless Steel Rigging Screw Jaw/Jaw - GS Products This isn't my idea.......I found it on another Triumph owners web site, but it seems like a good idea. You just need to remove one side of one of the 'forks' with an angle grinder to allow it to be mounted at the block end. It should allow more adjustment in order to get a better tension on the fan belt, or even allow a greater selection of fan belts to be used. So that's the current plan. Ian
-
Hello All, As mentioned in a previous posting I'm planning to do a dynamo to alternator conversion on my '68 Vitesse 2 litre Mk1. I've been looking for a block mounting bracket, which I believe is common with the iron block Spitfire engines and Triumph 2000 saloon., but so far no luck. You can pick them up for silly money from Rimmers and the like, but 35+ quid is way over the top in my opinion. Does anyone have a bracket spare that they're willing to sell for reasonable money? Thanks, Ian
-
Thanks Clive, Doug, Pete, Colin, That's a very neat installation Pete, and as you intimated the vast majority of installs I've seen pictured have the servo on the offside, rather cluttering access to the master cylinder. Were you able to achieve the recommended installation angle as per Doug's comments regarding the lack of a bleed nipple? I don't suppose you took any pictures of the battery tray mods at the time did you? Ian
-
Hello Clive, Did you mean 'Powertune'?.......I see that they are cheaper than the Rimmer kit, and buying from E-Bay saves even more over the Rimmer offering. Are these types of servo ok to use with silicon brake fluid? Thanks to Doug and Clive for the Mintex recommendation.......that at least seems to be a commonly accepted improvement!! Ian
-
Hello All, One of the improvements I've been considering for my '68 Vitesse 2L Mk1 is a brake servo. Don't get me wrong.......I enjoy the experience of driving a 60's era car, but that experience tends to diminish slightly when it comes to the 'put your foot down and pray' standard brake set up that Triumph fitted. At the risk of being virtually stoned in the street for such heresy, I wondered what other Vitesse owners think about the aftermarket Lockheed unit currently being offered by Rimmers? At 116 quid inclusive of VAT and P&P it seems like a very good deal compared to the prospect of getting the 5.5 inch mk2b Girling Powerstop I have in the shed reconditioned for over twice that price. I'd appreciate any observations from a Vitesse owner who has installed the Lockheed unit, i.e. their views on braking performance improvement, ease of fitment etc. Thanks, Ian


