

Bordfunker
-
Posts
1,005 -
Joined
-
Last visited
-
Days Won
17
Content Type
Profiles
Forums
Blogs
Gallery
Downloads
Store
Events
Posts posted by Bordfunker
-
-
She's out of hospital now, but not before my my wife, who's been staying with her, has come come down the lurge!
Hopefully things will settle down a bit now and I can get on with rebuilding the suspension upright.
Karl
-
Not a lot too report at the moment as I've had a cold and now my daughter is in hospital.
Nothing life threatening, but lots of toing and froing between home and hospital.
I did however manage to start the refurbishment of the driver's side upright and trunnion, removing the upright last night and breaking it down into its component parts.
In between visits today I attacked everything with lashings of Gunk and wire brushes.
Everything is now either drying off or soaking in more Gunk pending violent assault with a power drill and wire brushes.
I'll try and post some pics later.
Karl
-
Very nice looking Spitfire, however I can imagine the horrors that could lie beneath!
I've seen a few Spits that look like they've had everything below the top of the wheel arch replaced, so best of luck with yours.
Karl
-
I did a fair bit of Googling yesterday to find out how the valve worked as I wasn't too clear, and was amazed to find out that these valves, made in the UK, were used as original equipment on manufacturers from Volvo to Chevrolet!
There is even a guy in the US who specialises in rebuilding these valves at a $100 a shot.
Isn't the tinterweb great!
Karl
-
Not a lot to show this week, though I did manage to replace the old air filter with a nice clean new one.
Here is the old one in situ.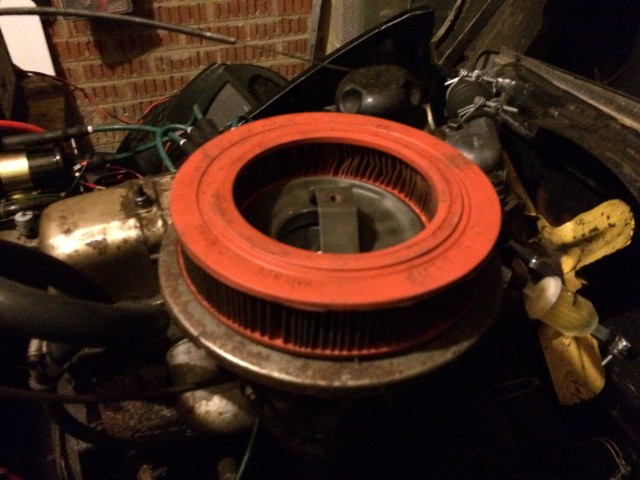
As you can see it's pretty mucky.
And here's the new one in position. Much better!
Given the lack of warmth in the garage, I decided to retire in doors and take a look at the heater valve that I had first looked at when I first acquired the Herald.
It didn't take miles of ownership to realise that the heater in my car was permantly on, fine in the winter, not so great in the summer!
Therefore at the start of this thread I removed the heater for closer examination, which soon identified a issue with the valve, obviously.
Now why not just replace the valve?
Because I have a Delaney Gallay heater, rather than the more common Smiths type. As well as looking different, each heater uses a different valve, and being the rarer of the two, the DG one costs around £90, so definitely worthy of taking a look at before shelling out for a new one.
Here's the offending item after a cleanup.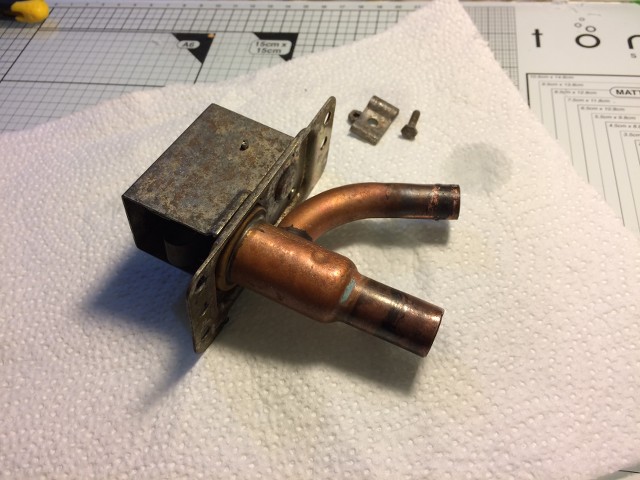
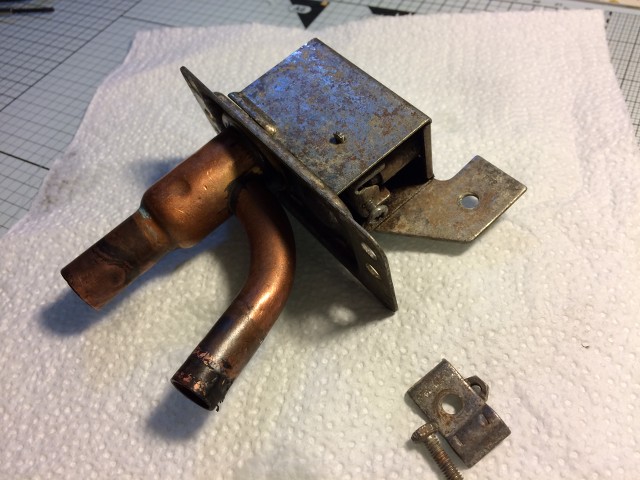
There's a spring loaded plunger inside the box bit which opens and closes the water circuit to the heater matrix.
Testing of the valve in the sink revealed that it wasn't sealing. (Yes Karl, we have already worked that out!)
Closer inspection made it clear that there was insufficient movement in the plunger, however I found that this could be adjusted by the screw in the picture below.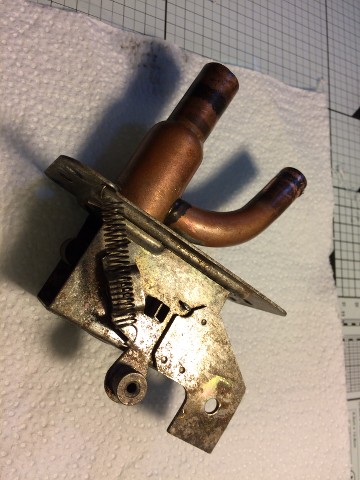
By screwing this in, it increases the throw of the yoke which activates the valve plunger, and thus effectively allows the valve to seal, as confirmed by a further test in the sink.
It now just needs oiling and it's ready for re-use.
Just need to get on and finish refurbishing the rest of the heater.
Karl -
Pete, the wiper rack is actually extremely well lubricated.
I removed it when I cleaned up the front bulkhead and painted it.
It's probably the best lubricated part of this car I've encountered so far!
Karl
-
Much happier now that the car is running properly again.
I'll have a go at re-torquing the head nuts at the weekend.
As for the wipers it's just a loose connection, as they come on when I jiggle the loom behind the dash or turn left!
Thanks again
Karl
-
I'm glad to report that the Herald is running beautifully.
The idle is now nice and steady, and the engine pulls cleanly, with no popping or banging.
I took the car out for a 25 minute drive this morning, up hill and down dale around Banbury, Bloxham and Adderbury, including some time sitting in a long queue of traffic, all without issue.
I pulled one of the plugs on getting home and was presented with this wonderful sight.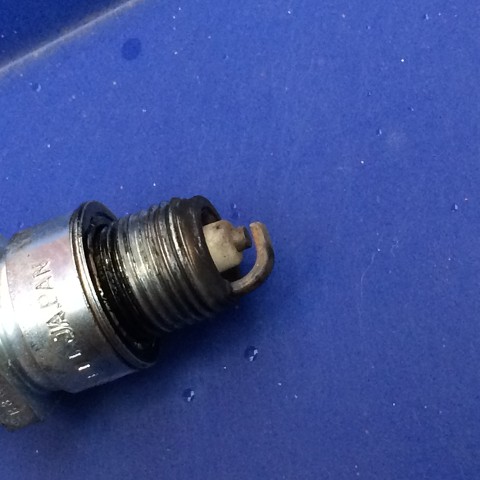
Before heading out I took the precaution of fitting a new fuel filter, just to be on the safe side.
That should hopefully prevent any more crud getting sucked into the carb.
One thing that I had noticed previously on the Herald was a distinct oil leak from the rear of the head to block, which I am assuming is down to the washers under the head nuts compressing over time.
I did check the head nuts, but not with a torque wrench, and they felt pretty tight.
Next up a shot of all the shiny new bits in the engine bay.
That's a new battery, coil, battery retaining stays and nuts, power lead to the solenoid (Lovely in red), new earth lead, and battery clamps, and hidden away, that new starter motor!
And over on the other side of the bay, that new brake master cylinder.
The old cylinder worked fine but leaked massively from the extension piece, so is now spare clutch master cylinder should I ever need one!
On a much cheaper note, I did get the interior light working!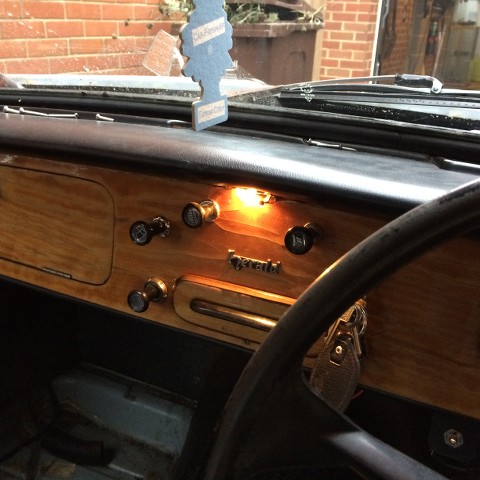
Now just need to get the wipers working consistently.
Thanks for everyone's help on getting this far.
Karl -
You're quite right I got that the wrong way round, however I have adjusted it the right way, and slackened off the mixture so that choke is actually required from cold!
Hopefully I'll get a chance to go out for a drive tomorrow.
Karl
-
Not had a chance to do anything major today, however I did exhume the 'old' plugs, well 3 of them at least as the 4th had broken in half!
These were then thoroughly cleaned, first with a wire brush, and then with cellulose thinners on a cotton bud and kitchen towel.
Here we are with 2 out of 3 cleaned.
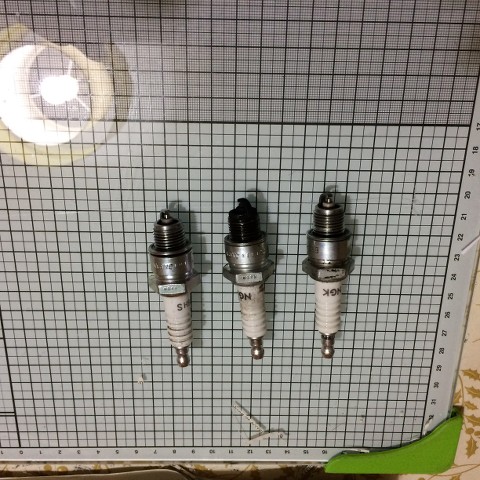
You can see how mucky these were getting.
After clean up, these were re-installed, and one of the in situ plugs given the same clean up treatment.
Before firing up, I slackened off the mixture using the screw on the bottom left hand side of the carb, which should hopefully stop the fowling of the plugs.
I'm pleased to report that she started on the button!
Next up will be a replacement air filter, as the current one is very grubby, which probably doesn't help much either according to the Haynes manual.
If the weather is half decent tomorrow, I'll try taking her out for a spin.
Karl
-
Tappets will be one of next stops alongside the timing.
The rocker cover hasn't been removed in a while as it is practically welded on, so it's anyone's guess when the tappets were last set.
I'll need to take the rocker cover off to check the timing, so might as well learn about checking tappets at the same time!
Thanks
Karl
-
Pete, these plugs are new NGKs so should be OK.
One of the old ones I removed cracked in half on removal!
I gave all the plugs a good clean up with a soft wire brush after the run this afternoon, and 1 & 4 were muckier than 2 & 3.
Not sure what to make of that.
Karl
-
Thanks for the additional info.
This afternoon has been spent stripping down the carburettor and giving everything a good clean.
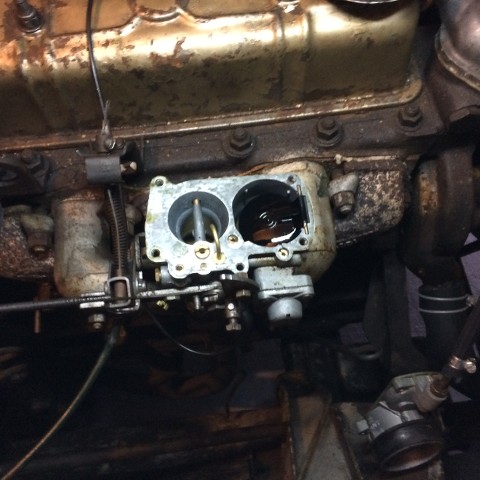
Here we are with the top removed, and prior to removing various jets and cleaning them out with some of my airbrush cleaning brushes, which are bendy enough to go around the swan neck, but firm enough to dislodge any muck.
I can confirm the existence of both O-ring and ball bearing beneath the swan neck, and no I didn't lose them!
The slow running jet was removed, and had the tiniest sliver of muck hanging out of the nozzle, which was gently removed.
The jets then all got a blow through with air from my airbrush compressor, with the pressure set to 90.
With everything clean I reassembled the carb, and put it back on the manifold.
Truth time, would it start?
Yes!!!!
Not only that it kept running!
I had a play with the idle speed and the volume control screw, and it now idles beautifully.
Next challenge, take it out for a spin.
Fine up to about 35, then it starts to pop and bang and feel like it's running on 3 cylinders.
I need to check the plugs to see if aren't firing properly, if they are all OK, then I'm assuming a timing fault or the points.
Any advice gratefully received, as it has been invaluable to date.
Karl
-
I'm having to start the car on full choke, and then push the choke back in immediately and then blip the throttle to keep it from stalling, which matches your description.
I checked all the other jets, and took the top off the carb to check the float chamber, all of which were clean and clear.
I would have checked the slow running jet if I'd known about.
Something for me to sort over the weekend.
Thanks
Karl
-
Pete that is where a photo is worth a thousand words!
I managed to get the Herald started this afternoon, it's not a consistent starter, and doesn't want to idle particularly.
I've tried adjusting the idle speed and the mixture as per the workshop manual, but to no avail.
I think I might have to call in a professional to set the carb up properly.
Karl
-
Thanks for that Pete.
I have at least one other earth lead hanging loose behind the dash.
There were three at one point, but I worked out that one of them ought to be connected to the interior light fitting.
That should at least be an easy fix.
Karl
-
I can only see one post from Aidan but a load of duplicates from Casper, very weird.
Aidan that would make sense that they have replaced the bi-metallic strip with a solid state device, given how cheap the latter appear to be.
On the topic of earthing the speedo, I noticed last night that I have a black wire with no connector hanging freed from the loom behind the speedo.
Is this possibly the errant earth wire?
Karl
-
Thanks both of you.
That does ring a bell, as in my dim and distant past I owned a 1200 VW Beetle, a proper one with an air cooled engine in the back, and the fuel gauge on that didn't work either, and that was down to the voltage regulator.
Looking on Rimmer's they look pretty cheap, so I'll add one to my next order.
Thanks again.
Karl
-
I can see the voltage regulator on the back of the speedo, and the needle on the fuel gauge moves relatively slowly.
I hooked up a volt meter to both the sender end of the system, and the gauge end, both of which gave me a reading of around 12v, therefore think the issue may be with the sender as the gauge always shows pretty much full.
Tried stating the Herald again just now. No dice.
Seems to be churning over quiet slowly at the moment like the battery is down on amps, but showing good volts.
Not sure what is going on there as the battery is new.
Leaving it to charge for now.
Karl
-
May be its competing with the christmas tree lights and just winking in tune with the festive accounting season
did you connect the earth lead to the speedo clamp ??? There should also be a support ring on the back of the speedo to spread the load of the clamps distorting the fibre panel
although most get thrown in the bin as a pain, to get it all aligned when you cant see and cant feel
what you attempting ...... then need the sticky plasters
pete
The support ring on mine is on the front behind the chrome bezel!
As for the earth connection to the speedo clamp, I'd need to take another look.
I spent about 40 minutes lying on my back, with my head in the footwell, resting on the brake, with my legs over the back of the driver's seat, just trying to put the speedo back in properly.
The speedo is still sitting at a slightly jaunty angle, so I will have to revisit it at some point soon anyway. That and I need to take a look at the fuel gauge as that is clearly not working.
Casper, no intention of touching the tank at any point soon.
What I will be doing later is cleaning out the carburettor to be on the safe side.
Ironically I had installed a new filter last week, only to remove it again when the Herald wouldn't start.
That'll also be going back on.
Karl
-
'Work' it's that thing that pays for the roof over my head and the food on the table!
I have actually done some other bits on the Herald, such as fitting the new speedo retaining bracket that Colin sent me, so that now the speedo is firmly attached.
I also got around to replacing a lot of the screws that were supposed to hold the dashboard in, as these were missing as well, and while I was it re-installed the missing interior light which I found hanging behind the dash.
That still leaves the intermittent speedo illumination to sort out, but that's a job for another day.
Karl
-
Work has been extremely hectic over the last few weeks due to my company having finance year end on December 31st.
Which muppet decided it would be a great idea to have such a critical event slap bang in the middle of the festive season?
Probably someone in Finance without a social life or family!
Anyway, whinging aside, I've managed to get some time to work on the Herald on Boxing Day, and try and get it started.
I'd already replaced the battery, coil and condenser, so next step should have been the points, however before I did that I took a look at the plugs.
These turned out to be oiled up, and when tested didn't produce a spark, but luckily I had a spare set of plugs, so these were gapped and fitted, and hey presto! I had a Herald which started!
And then when I tried it again on Monday, it didn't! Aaaaagh!
So today it was out with the plugs, cleaned them all up with my new brass brush, then put them all back in.
Still no joy!
Then I noticed that in removing the plugs I'd managed to pull the Lucas connector off the distributor to coil lead. D'oh!
With that replaced everything started as it should, so took the Herald for a spin around the estate on which live, only to have it splutter to a stop 500 metres fro home.
No fuel!
After walking back home, Mrs B drove me to the local garage with a fuel can, and then back to the fuel-less Herald.
The Herald started easily enough, but stuttered it's way for the first few hundred metres as clouds of black smoke poured out of the exhaust, almost 50 years of crud from the bottom of the tank being sucked through the carb!
I guess I know what I'm doing tomorrow.
Karl
-
Thanks Colin, PM inbound.
Karl
-
Thanks for the suggestions guys.
I'll pop the speedo out and take some pics tomorrow.
The nut is just a knurled disk, and the bracket is a flat rectangle folded into a tube at one end, which slides over the threaded stud and holds the speedo against the back of the dashboard.
I've been looking on the net for pictures of these, but every picture just shows the studs.
Karl


** 26/02/23 Heading Up ** Probably how not to restore a Herald!
in My Triumph Restoration Project
Posted
Back up to strength now after a couple of days laid up in bed.

With that nonsense out of the way I decided to continue with the work on the driver's side front suspension by having a look at the state of the wishbone bushes.
They all look a bit tatty, particularly the damper to lower wishbone one, so I thought 'What the hell!', I might as well replace them all with poly bushes now while I've got the suspension in bits, as I don't want to do this again anytime soon.
You can see the state of the bush in this picture.
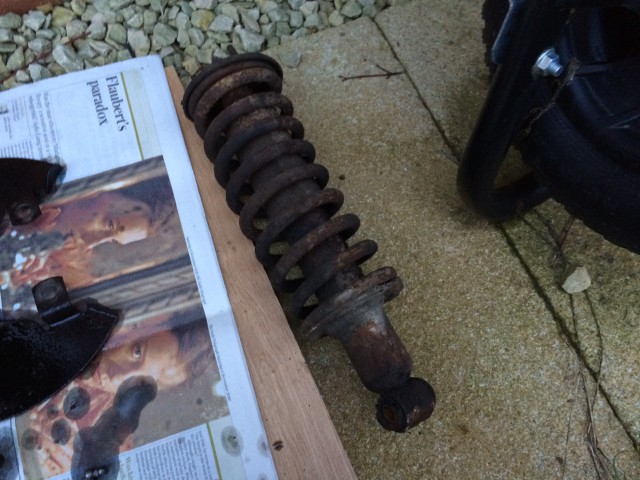
The spring and damper look a bit scabby, but work fine, and just need a good clean up.
To assist with that I've ordered a spring compressor from the club shop, as I figure it's one of those tools that will last forever, and save me a few bob along the way.
All of which lead to this.
Excuse the poor lighting.
The upper wishbones came off with nair a fight, however the same could not be said of the lower wishbone, where the bolt through the front bracket simply refused to budge.
Here's the offending item after removing the bracket itself, but still attached to the wishbone.
At first I thought the bump on the bracket was a bead of weld, till I realised the rear bracket had something similar, and that bolt came out without drama.
However clean up soon showed it wasn't, and that wasn't why the bolt was stuck.
The bolt was so stuck, the bracket didn't even want to move on the bush, which means my strip down was probably well timed!
I had to resort to extreme violence with a lump hammer to drift the bolt out, as even compression in a vice wouldn't get it to budge, which left me with this.
Note what looks to be a nasty crack across the bracket, probably the result of my judicious use of force!

Scratch one bracket, but better now than on a roundabout somewhere.
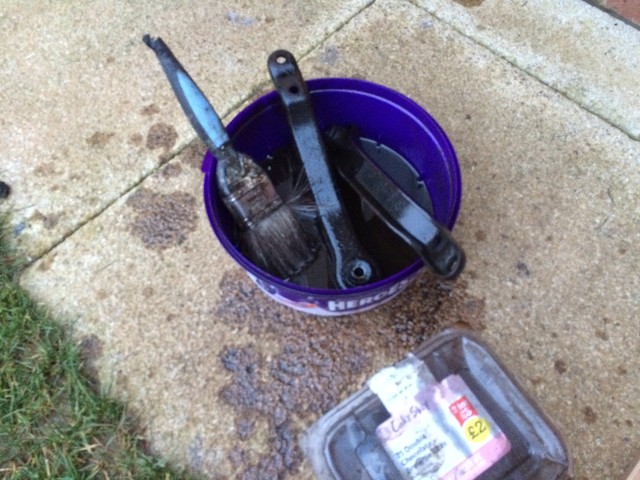
With everything removed, I broke out my high tech parts washer.
Well after ordering those poly bushes I couldn't afford anything flash!
Everything then got a thorough wash in hot soapy water, and then was laid out on newspaper to dry.
Look at that lovey shiny trunnion!
My next challenge was how to remove the old bushes from the wishbones?
The jaws on my vice won't open wide enough for the normal method, so what to do?
Here's my Heath-Robinson solution, utilising an F-clamp, a socket and a bolt driver bit which just happens to fit nicely.
Despite its makeshift nature this shifted 3 of the 4 bushes very swiftly, with just one left in the lower wishbone, which I'll need to tackle next week.
Here are the 2 upper wishbone arms minus their bushes, and awaiting clean up.
Everything now needs a good clean up with wire brushes and electric drill, ahead of a coat of paint, and fitting of the new bushes.
I've ordered blue, comfort, poly bushes as I don't think my little 1200 really needs the control offered by reds, along with new bolts and nuts.
So I figure I've a week or two of clean up and painting before I can start reassembling the driver's side suspension, then repeat on the passenger side.
Karl