

Adrian Saunders
-
Posts
339 -
Joined
-
Last visited
-
Days Won
1
Content Type
Profiles
Forums
Blogs
Gallery
Downloads
Store
Events
Posts posted by Adrian Saunders
-
-
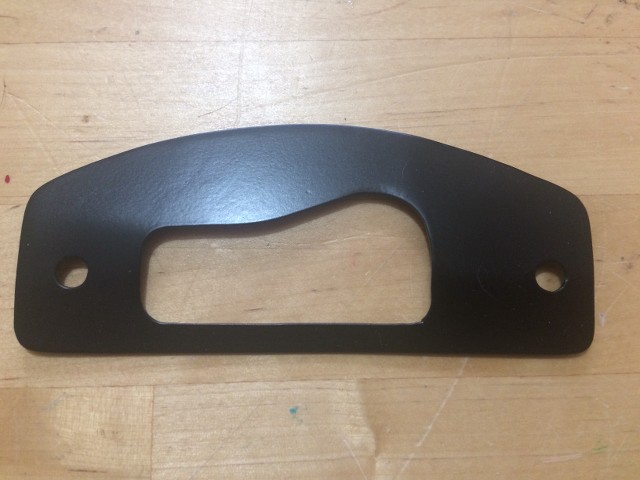
Colin, I sent an .stl file of your part to one of our chaps this morning and he’s 3D printed your part. Just so happens that I’m in work tomorrow so I’ll collect it and check it against your original. If it’s ok I’ll do the same modelling and a print of the other base plate. I’ll send the prints to you with your originals. The prints won’t have the bend in as our printer isn’t brilliant and it would affect the quality. However, after a score with a Stanley knife it’ll bend ok. The CAD models and the drawings will have the bend in and the drawing will also show the bend details. The .dxf file for laser cutting will be a flat pattern (no bend). Please check with your “engineer-in-laws” if a .dxf file is ok. If not, tell me what they need.

-
I have just bolted my brake discs to some new, aluminium hubs and some of the spring washers have deformed as per the attached picture. I’m considering swapping to Schnorr washers as we use these at work, they cannot deform in this way and they still bite into the fastener head and part. Has anyone else experienced this deformation and changed the washer type?

-
3 hours ago, Bordfunker said:
Adrian, that looks excellent.
I ended up going the old skool route with sheet steel.
Karl
Karl, an excellent result for you too. It’s fine and also cheaper to just go and do it and it will of course fit. If anyone wants knock out a quantity of the plates though, the CAD solution wins as the go straight to a laser cutter and knock ‘em out by the however many. Also, my CAD work is free to a good home. What did you paint yours with?
-
Oh chain drilling. It’s like having a miniature Bridgeport. The threads had failed in the nut and not on the bolt and the nut had reached the plain shank of the bolt! You can see the plain section showing through the washer in the 2’nd picture. I think that the wishbone repairs are different on my two and I know that I only measured the other (offside) when sizing the new bolts. Anyway, new bolt, washers and nut installed and all ok.


-
Colin, pdf attached. Would you print this off at 1:1, cut it out and try it out on the light please. For whatever IT reason I can’t print it 1:1! I have checked the part against the image on the screen and it’s very close.
-
30 minutes ago, KevinR said:
What tensile strength bolt and nut have you used ?
if they are too low then that might explain the stripped thread
Indeed. As far as I know they are “S” rated. Standard run of the mill bolts from CC as used generally all over the cars. Interestingly, offside ok and near side not. That’s what’s pointing me at the wishbone repairs.
-
8 minutes ago, ahebron said:
Hi Adrian
I dont see why you would need to do this with the longer bolts unless the repairs have made to the wishbone have neccessitated the longer bolts
The design of this fitting is very different in operation to the original trunnion which did have a degree of pivot on the bolt which was made worse when the bolt and trunion sleeve became one and would then wear out the wishbone. With this design all you are doing is bolting it in place to make it 'solid' with the wishbone the movement is taken care of with the 'rose' joint , I suppose if you so desired you could weld the joint to the bottom wishbone but fitting the shock would be interesting.Adrian
Hi Adrian,
the repair has been facilitated by welding washers onto the wishbone to bolster/replace the original holes. So, as the clamping area has increased In length I’ve endeavoured to improve on the original design intent by ensuring that the unthreaded portion of the bolts is indeed the only area taking the load. I appreciate that the original design (intent) lasts for decades but it is technically flawed and as a mechanical engineer I like to make these improvements. For those not wishing to switch to trunnion-less uprights, the correct length bolts are a viable proposition to a bodged/original solution, not a bad option.
I am still hoping that I have made a mistake with washer quantities and will be able to replace. -
58 minutes ago, Adrian Saunders said:
No problem fella. I thought you were referring to Dave CC. The damper bolts are 7/16” UNF too so, as a starting point, I was tightening them to the same. That shouldn’t have been a problem but, it appears to be. However, as my wishbones have been repaired at the trunnions bolt holes (previous owner), I have employed longer bolts so that the unthreaded portion is at the bearing areas, added washers as applicable and the shortened the threaded portion to suit. I’m wondering now if I’ve got the washers wrong and the nut went solid on the unthreaded portion. This damaged the thread rather than torquing out and eventually trashed the nut and pulled all of its threads out, so it can’t turn back off the bolt.
What do you guys think about the thread stripping? Feasible?
-
Picture as per PM Colin. If I match the outer profile, holes and the bend, the high point of the internal cutout switches hand, the high point on the part on the bottom is obscured/on the right. Is that correct?

-
6 minutes ago, Peter Truman said:
So if the nut is stripped if you cut the protruding thread part of the bolt off level with the top of the lock nut could you then drive the bolt back thro the stripped locknut? just a thought this way everything is accessible. might work?
Peter T
Excellent, another potential fix. Thanks Pete. I think that bearing in mind the assistance/advice that you guys give, I shall join the club even though my car is still not on the road. Is this year a Classic Le Mans year? Do the TSSC have Tertre Rouge again?
-
15 minutes ago, SpitFire6 said:
Dave is the guy who sells the kit at Canleys. A joke. Sorry.
They need to be very tight. Tight.
Apparently that was too tight? Same size as damper bolts?
No problem fella. I thought you were referring to Dave CC. The damper bolts are 7/16” UNF too so, as a starting point, I was tightening them to the same. That shouldn’t have been a problem but, it appears to be. However, as my wishbones have been repaired at the trunnions bolt holes (previous owner), I have employed longer bolts so that the unthreaded portion is at the bearing areas, added washers as applicable and the shortened the threaded portion to suit. I’m wondering now if I’ve got the washers wrong and the nut went solid on the unthreaded portion. This damaged the thread rather than torquing out and eventually trashed the nut and pulled all of its threads out, so it can’t turn back off the bolt.
-
12 minutes ago, clive said:
I think I would try a cutting disc, go in from an end and take a slice off the side of the nut without touching the bolt thread. Not as hard as it sounds. Then a small chisel to split the nut
Good idea. You’ve inspired me. I don’t have a cutting disc so I’m going to chain drill along the nut, along the axis of the bolt. Then I’ll turn it 180 and do the same. Then chisel. I have some more bolts. Thank you.
-
6 minutes ago, SpitFire6 said:
Dave will be cross with me.
What you on about chap?
-
On 28/04/2020 at 22:44, SpitFire6 said:
Make sure it is really really tight.
Not fun when loose.
No locating mechanism relies on friction.
Tight.
Aaaaaagh! Expletive! So, torqued up the offside to 44 lbs/ft (same as damper bolt) but, on near side, thread has stripped at bolt and/or nut! Of course now it won’t undo and allow me to fit a new bolt too. But why strip anyway? Same torque as damper bolt. Anyone used a nut splitter on this fastener? There’s only an inch space in there.


-
3 hours ago, TrafficMan said:
Adrian, may I ask, what colour your Koni dampers are ?. The reason I ask is that I know that Koni produce black or red dampers in their Classic range. I want black for my late 73 GT6 being 80-1388 Front & 80-1389 Rear. Rimmers tell me I can only get those ref. numbers in red but Demon Tweeks tell me they can get them in black. Rimmers slightly cheaper and only down the A46 from me. Are you able to shed any light ? Many Thanks - Paul.
Hi Paul. Mine are red. I’ll get some numbers off them for you tomorrow.
-
Do you have an endoscope and an iPhone?
-
2 hours ago, Colin Lindsay said:
Yes Adrian, will PM you. Sorry, been very busy doing absolutely nothing; the time is flying by and I've no idea how it goes in so fast.
Or: PM me if you will.
Colin, I think I’ve PMd you.
-
20 hours ago, Colin Lindsay said:
Brilliant work, young man. The photo was more or less straight-on, but I had to angle it slightly to avoid reflections from the overhead lights.
I'll still send the original across to Adrian, it may be handy to have the plans for a part like this on the record, but I'll be very interested in seeing your handiwork.
Colin, do you need my address?
-
Are there any firmer, shorter springs available that don’t need an adjustable seat on the damper? I remember some with a ferocious rate of 660 lb, they didn’t need adjustment.
-
Right, springs are off and I’ve checked them. 12.5” free length, 7/16” wire diameter and, employing the “sit on the spring and get the wife to measure the compression” method, they are definitely no more than standard rate. The compression check didn’t go too well, I was wobbling too much. I’m going to do it again tomorrow with a plank secured at one end and nominally level, won’t be as wobbly. Thing is, I’ve got std front springs but the rear spring has a 3/4” lowering block underneath it so, if I’m not careful, I’ll be guiding Chinooks into landing. The only thing that we’ve seen going to and from Birmingham airport this week. I guess I need firmer/shorter front springs to level the car?
-
On 27/04/2020 at 10:52, dougbgt6 said:
Adrian,
You probably know, but I'll say it. Get hold of a proper spring compressor, a plate at either end and long threaded studs. Not those horrible dangerous things that clamp on the sides of the springs and ping off at high velocity when you least expect it!
When I first got my car the PO had used it to tow a boat far too big for it. The rear spring was broken and the front, although standard, 2" shorter than when they started. After 40 odd years I replaced the front again, principally because of extreme rust, however I found them no shorter than they should have been.
Doug
Doug, so, my compressors are the double-claw variety which go around half the wire and certainly look secure. Unfortunately, they’re too big to fit in between the coils of my springs.
-
49 minutes ago, SpitFire6 said:
Make sure it is really really tight.
Not fun when loose.
No locating mechanism relies on friction.
Tight.
Certainly will.
-
12 hours ago, ahebron said:
I too fitted them and it all lined up.
Is it out on both wishbones?
Have your wishbones had oval holes repaired?Adrian
They have been repaired. I fitted the pivot blocks tonight. I knocked an old bolt in from the wrong direction and then chased it out with the new one. All ok now.
-
12 hours ago, Anglefire said:
Hi Adrian, I don't have such a need at the moment - I just noticed you are local to me - and my Inlaws are from Chelmsley
Doh! My claim to fame was having the only GT6 in B37. Please don’t tell me you have one. Or, are you the owner of a dark Herald? I saw it once in Asda’s car park.


Spring washers.
in General
Posted
Pete, did you ever try Schnorr washers? They’re quite similar to a Belleville but they have serrations both sides.