

Bordfunker
-
Posts
1,005 -
Joined
-
Last visited
-
Days Won
17
Content Type
Profiles
Forums
Blogs
Gallery
Downloads
Store
Events
Posts posted by Bordfunker
-
-
Pete, having cut open the chassis rail this afternoon, it definitely looks like the interior got a coat of black primer of some description.
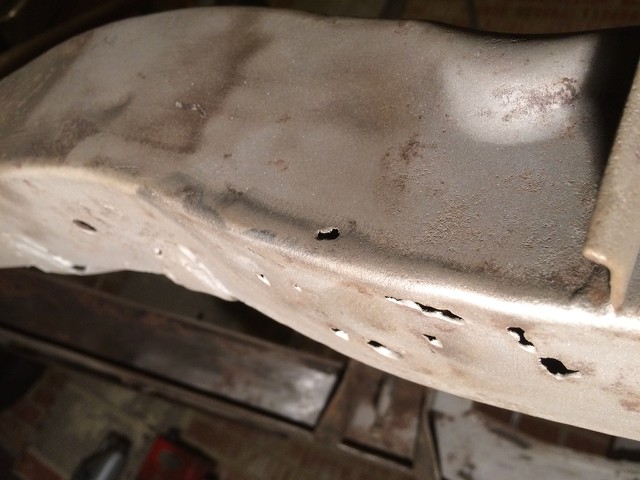
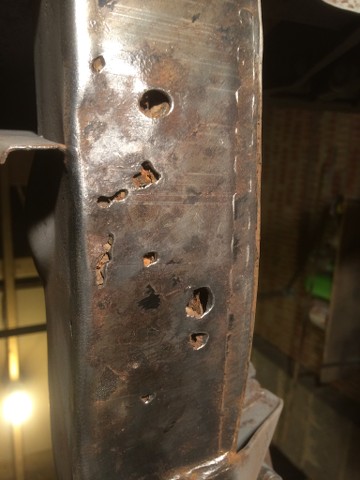
Speaking of which this is the holey section that I cut out.
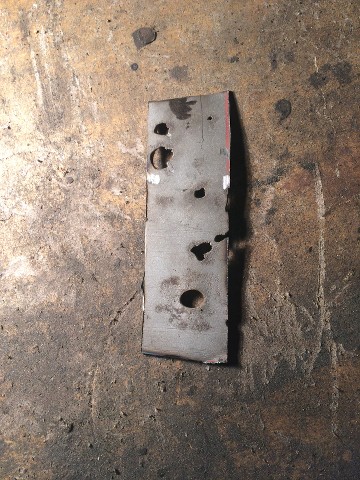
And the reverse side.......nasty!

Not pretty, and remember all the gunk hiding in the chassis rail?
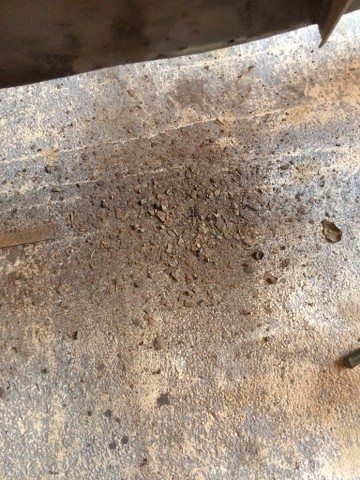
It looks like a family of squirrels have been living in there!
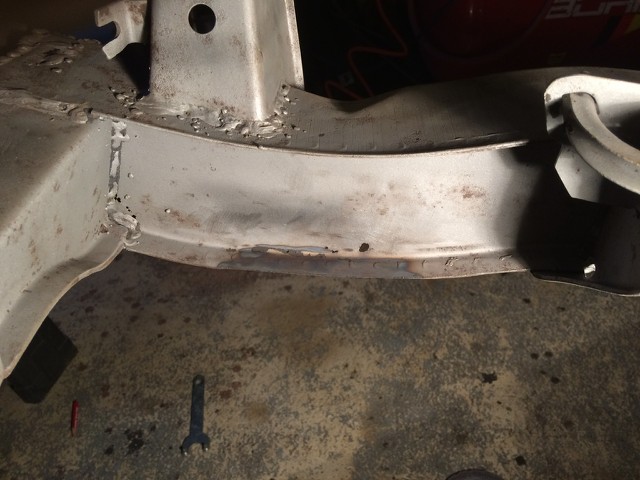
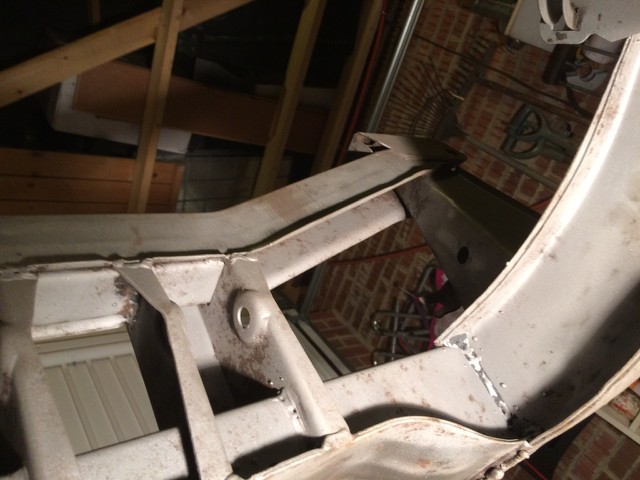
Looking inside of the chassis rail itself, it's clear that the rot has been very localised, with just surface rust over those areas of the interior not still covered in original primer.
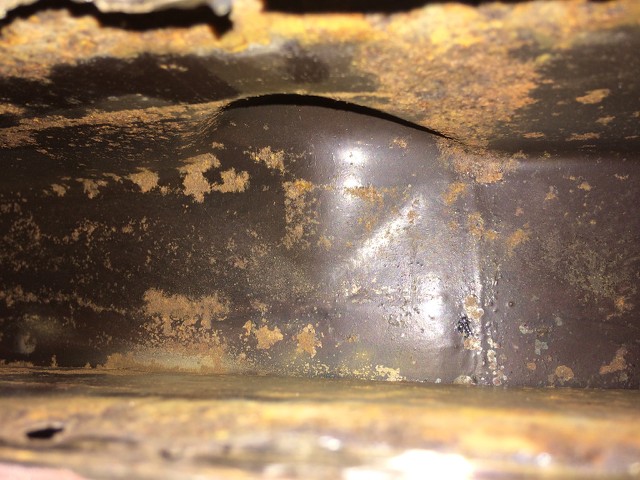

You can see the hole in the inner face of the chassis rail that appeared after I cut the patch out, and also the fact that the rust is really limited only to the very bottom of the rail, and doesn't extend into the seam itself thankfully.
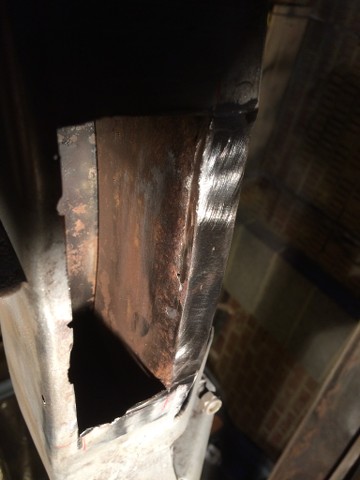
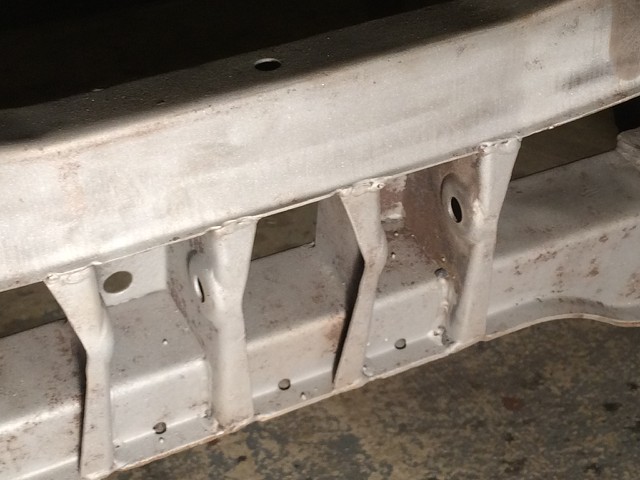
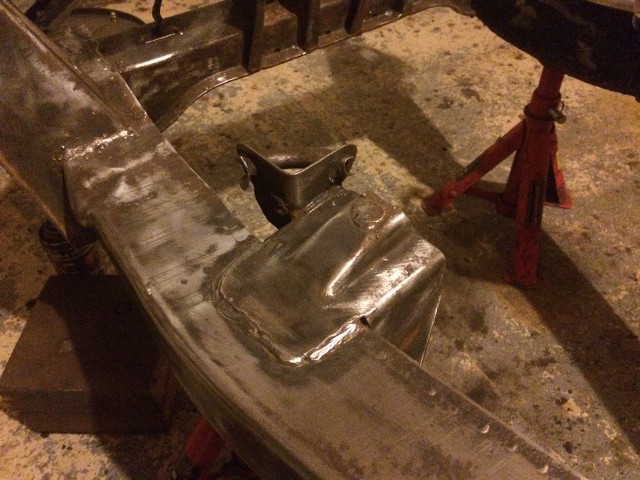
This is after I had cleaned back the flange, and prior to cutting out the section with the hole below.
This is after cutting out a section of the inner face, with the new metal just tacked in place.
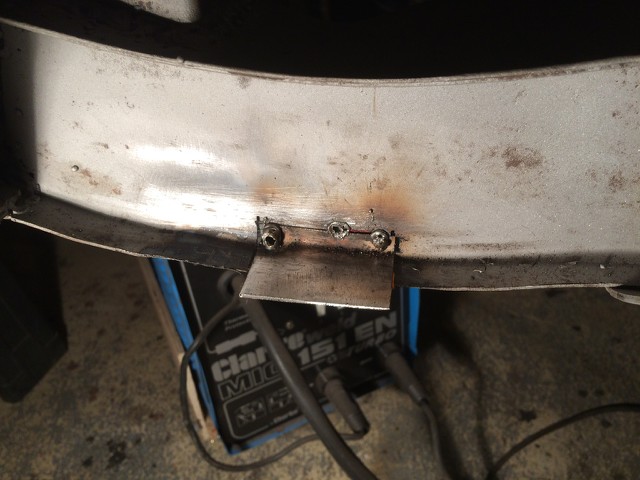
This was then seam welded and the lip cut back to match the bottom of the chassis rail.
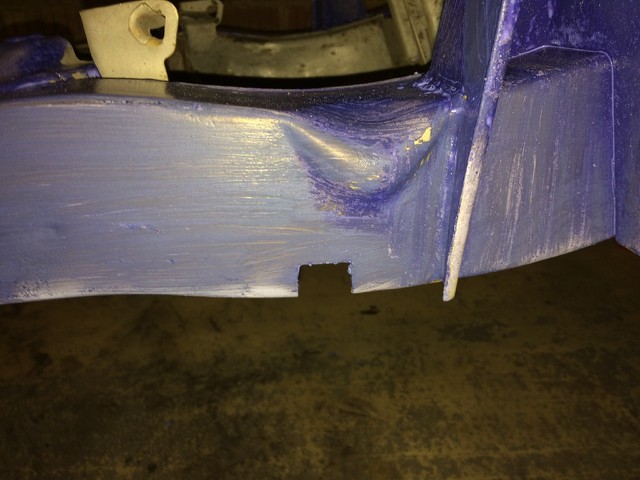
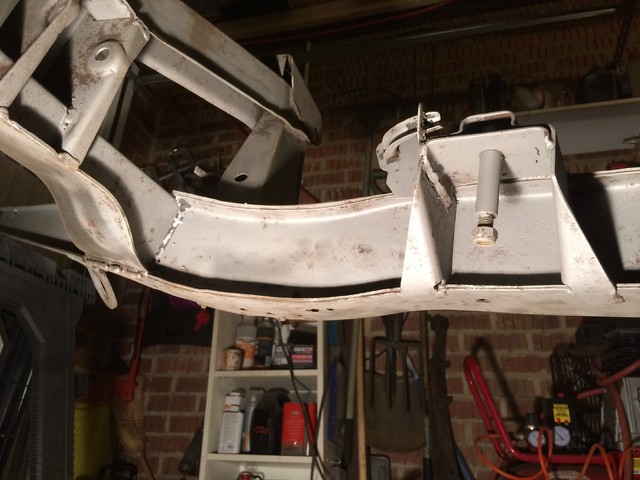
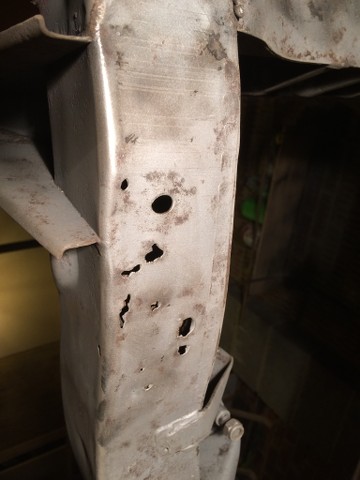
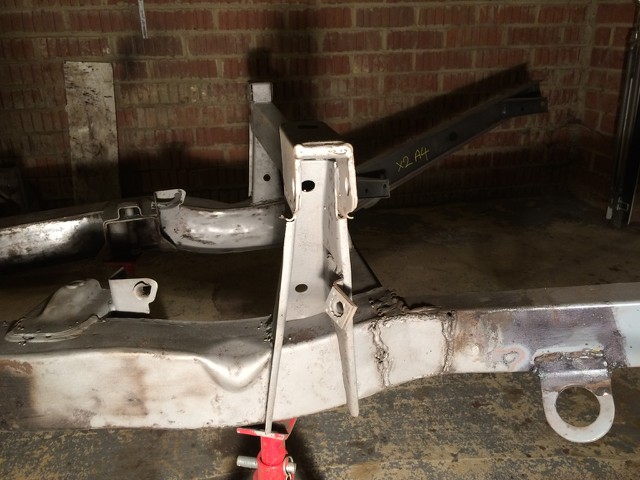
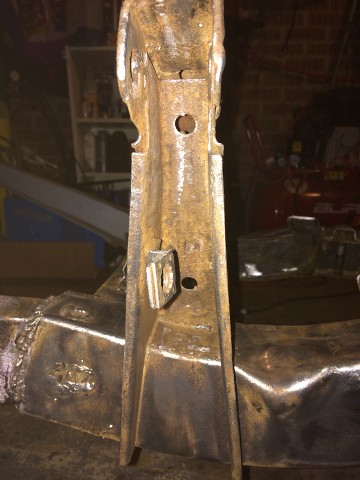
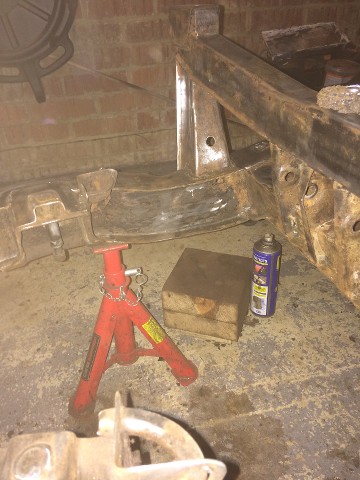
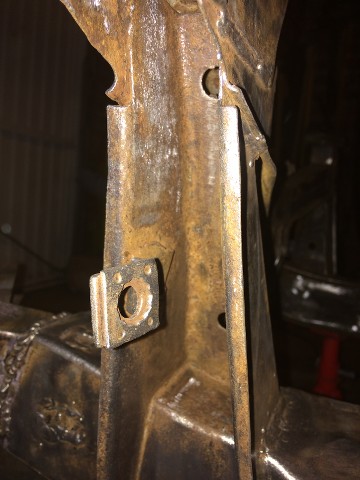
Annoyingly there is also a hole in the outer vertical plane of the chassis, you can see it in the photo below.
Again the rot is very localised, so I cut out only a small area ready for patching, before applying rust inhibitor to both the inside and outside of the chassis, hence the funny colour chassis!
I have already cut out a patch for the main repair section, which is now needs final cutting to exact size before I get around to welding it in next week.
So despite yesterday's set back with the discovery of yet more rot in the chassis, it does feel like I am still making progress, albeit more slowly than anticipated.
Karl
-
Pete, it’s a pity Triumph didn’t do that when they built these cars.
Once all the chassis paintwork was done I was going to inject all the box sections with wax, even more determined to do it after this.
Karl
-
I always remember reading an article by Rowan Atkinson in Car magazine back in the 90's and he always reckoned the best time to buy a model was then it was about to be replaced, for two reasons:
- By then they had generally worked out how to build it properly!
- And the manufacturer usually throws all the options at the run out cars to get rid of them!
My wife bought her C3 Picasso when they were being phased out, £6k discount, and a bucket load of goodies to boot!
Karl
-
It's Saturday, I don't have any children to drive anywhere, and Mrs B wants to spend the afternoon sewing, which freed me up to go spend some quality time with the Herald.
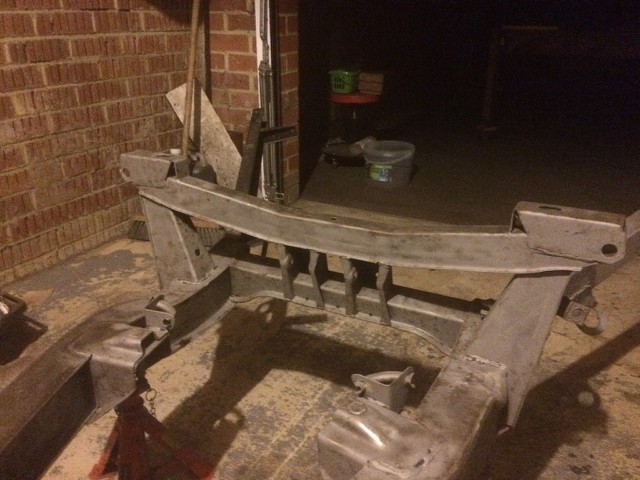
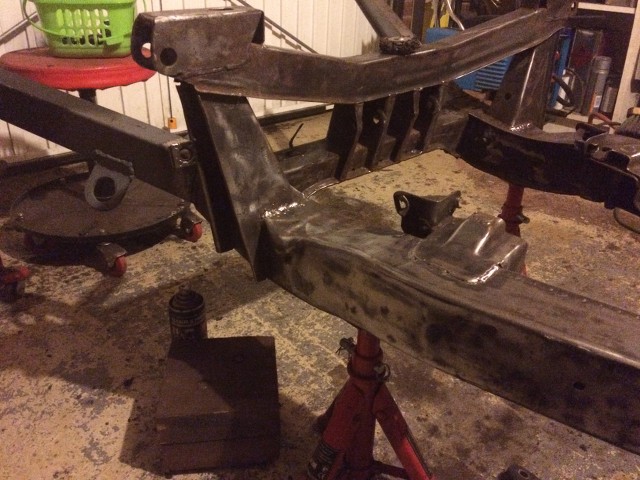
Yes, more of the same, I'm afraid, blasting rust and crud out of the Triumph's nooks and crannies, starting with the top hat section above the rear diff mounts.
Access here is very difficult, especially with the chassis at normal height, so I hoisted the rear of the chassis up on a couple of trestles, giving me more room to work.
As a result I was able to get a lot of the crud out of this section, but there is still more to do.
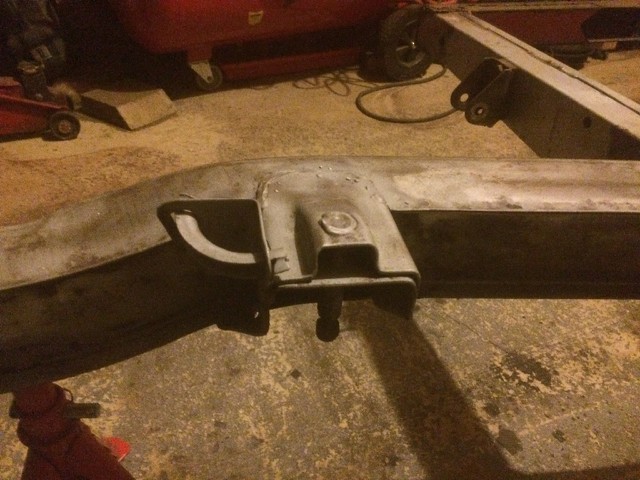
I also got into the front diff mount on the passenger side, getting that nice and clean, as well as the inner chassis rail between it and the diff bridge.
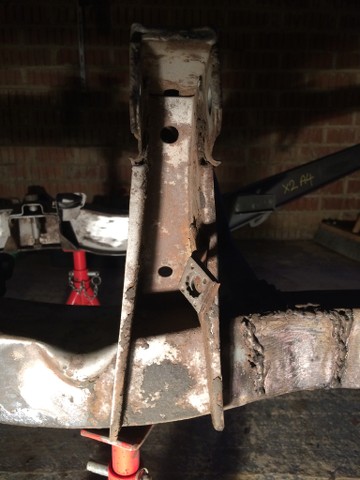
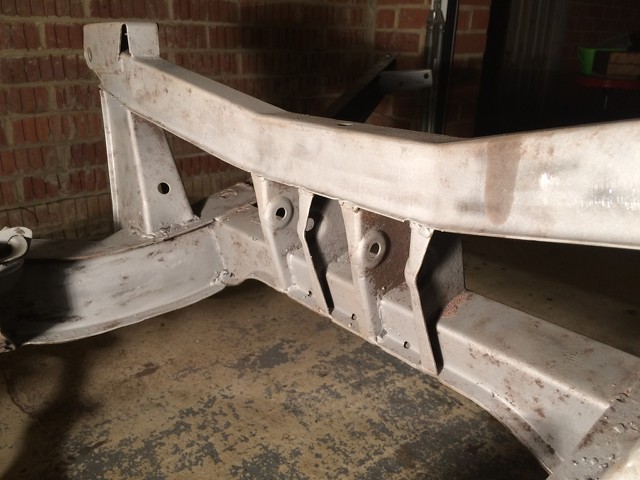
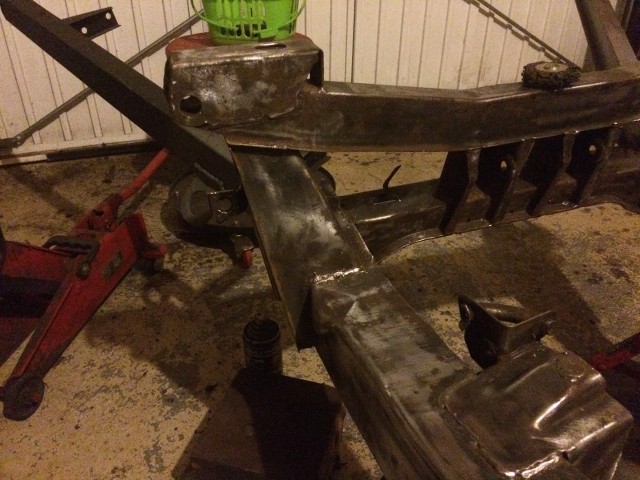
With the chassis up in the air I attacked the underside with an angle grinder and a wire brush to take off the last remaining area of under seal before I gave it a blasting, starting on the passenger side.
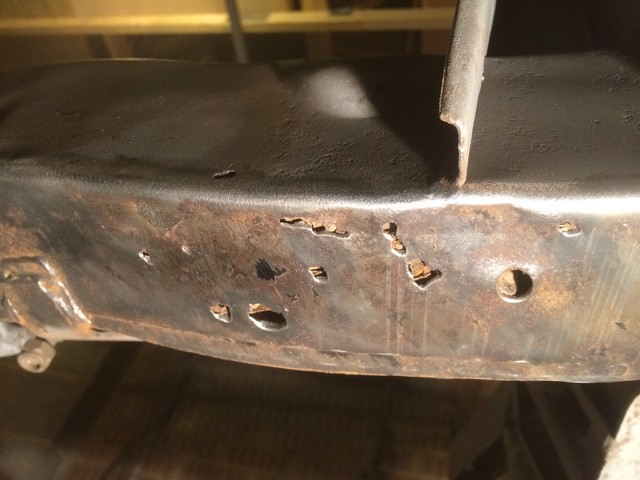
2 minutes with the angle grinder left me with one of those 'Oh bugger' moments, and here's why.
From the leaf debris visible through the holes, it's obvious that the chassis has rotted from the inside out.
With my heart in my mouth I did the same on the driver's side, but in this case there were no unwelcome drainage holes, just solid looking steel.
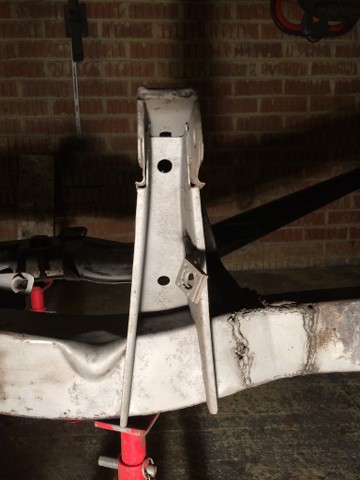
I then blasted the passenger side again, leaving me with this.
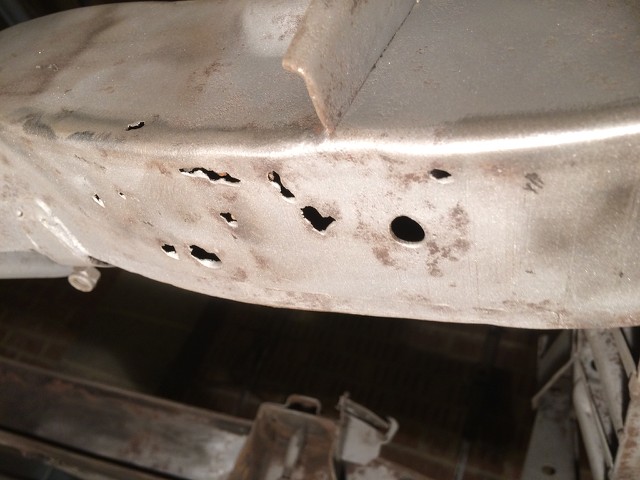
I am going to have to cut out the rot and carefully weld in patch using some 2mm steel, as there are no repair patches for this area, just the inner curved section.
Before I packed up for the evening I thought I'd do something more fun so cleaned up one of the shock absorbers with the blaster.
Before & after.
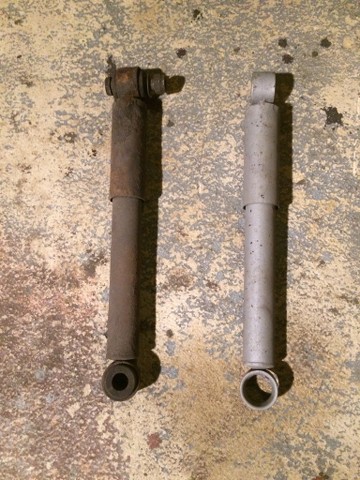
I am quite pleased with that.
In the midst of doing all this I had a visit from a neighbour, who hearing the compressor running had come round to see what I was up to and introduce himself. Turns out he's restoring a car too, in this case a DeLorean!
That was a surprise.
Karl
-
 2
2
-
-
I only managed a couple of hours in the garage this weekend due to yesterday's trip to Lancashire to take youngest son back to university, and then having to sort out the remains of the Xmas tree, and all the other things I didn't get to do yesterday.
After last week's tribulations with goggles & glasses steaming up, I purchased a face visor type mask from Screwfix for the princely sum of £7.99, therefore time for the obligatory selfie!
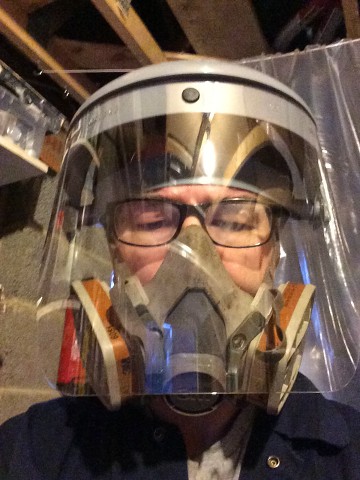
Looking like a cut price Darth Vader I think!
Happy to say, that while it looks a bit ridiculous, it does actually work very well.
All of which allowed me to get on with the media blasting.
This is the passenger side upright, looking pretty manky.
And here it is after the attentions of the spot blaster.
These are the types of areas that I specifically bought the spot blaster for, and am really glad that I did, as it works a treat.
I then went back to the rear diff mounts, as these need further work.
The driver's side is pretty much done here, but the passenger side still needs more clean up, which will have to wait for next week.
Next week I'll get under the chassis and do the box sections where the front of the diff mounts, as well as the underside of the main chassis members, after which I'll apply rust inhibitor and epoxy mastic primer.
Karl
-
1
-
-
Having spent 20 years commuting on the M40 I have never actually seen a vehicle on the hard shoulder being hit, which I would have thought was statically impossible if a car was hit every 11 minutes on the hard shoulder.
Doing anything on the hard shoulder is dangerous, but is it more dangerous to spend 10 minutes changing a tire than spending 90 minutes in the same spot waiting for the breakdown services?
Karl
-
Normal primer is next to useless as protection, if anything it’s probably worse than doing nothing, as at least then you can see the rust if you don’t paint it!
As you can see from the pics I still need to give a number of areas another going over, so once is done, I’ll apply a coat of epoxy mastic.
I did think about painting it with a brush, but in order to get into all the nooks and crannies I figure spraying is a better option even if a bit more hassle.
That will have to wait until Sunday, weather permitting, as Saturday I’m taking number 2 son back to uni in Lancashire.
Karl
-
Tony, if I used that I'd have to do all my blasting lying down with my head on the garage floor!
Rob, I'm lucky that my garage is amazingly dry, not sure why, and I don't seem to have an issue with flash rusting.
Having said that the aim is to get the back end of the chassis done over the next couple of weeks and then apply the epoxy mastic primer.
Colin, I know exactly what you mean about the finish, the wire brush, even in a grinder just polishes the rust in any pits, whereas the blaster just removes it.
The downside of blasting is the need to sweep up the media afterwards and then sieve it before you can re-use it, but at least it keeps the costs down.
Karl
-
Having finally fallen out of bed at about 11 this morning, and established that Mrs B didn't want to go anywhere on New Years Day, an opportunity presented itself to go play in the garage with my new toys, but which ones?
Do I use the new puller to remove the drive shaft flange from the diff and replace the leaking seal, or break out the spot blaster and attack the chassis?
Obviously I went for the noisy option, media blasting!

The diff mounting point on the left has been partially blasted, while that on the right hasn't been touched yet.
There followed several hours of zapping everything with the blaster, and generally getting a feel for how to get the best out of it, which left me with this.
Looks almost new!
I gave up on using the bag that came with the spot blaster, and just used a plastic container under the pick up tube, which was much less hassle to reload, and just went around the rear of the chassis cleaning off the old paint and rust.

I'm loving the blaster, as it makes removing rust and paint from nooks and crannies a lot easier, and leaves a keyed finish which is ideal for the epoxy mastic primer that I will be using.
It was particularly good on the insides of the uprights for the rear shocks, remember this?
Twenty minutes with the blaster and I had this.
Well chuffed with that!
Overall that was a good start to the year, now I just need to work out how to wear a dust mask, ear defenders, goggles and glasses without my glasses steaming up!
Karl
-
2
-
-
3 hours ago, Anglefire said:
I have a socket set that I bought more than 35years ago that is still going - was very mistreated in my youth - went through several ratchets doing up the rear hub nuts on my Beetle - 6' scaffold pole over the handle was the usual method!
I now use a lot of the Halfords tools - the Pro ones - because they have a lifetime guarantee and are actually very good - the torque wrenches are made by Norbar from memory.
I’ve still got the bloody massive Allen key in my toolbox for removing the sump plug on the Beetle.
I can remember acquiring a length of scaffolding pole for the rear hubs on the Beetle, I have no idea where that got to.
Karl
-
Just now, poppyman said:
I did'nt think cash converters sold tools? I will pop in next time.
Tony.
I’d always suspected that Cash Converters was where ‘tools’ ended up!
Karl
-
 1
1
-
-
The bulk of my sockets are from a Halfords set that I bought for my first car almost 30 years ago.
I guess those are my good ones!
The two in the photo are metrics from when I used to own a Beetle, so semi-sacrificial.
Karl
-
I found that when I did the front suspension on the Herald.
Passenger side was a faff as first time I’d done it, driver’s side was a breeze!
Karl
-
Colin thanks for that, that looks a lot less hassle.
I went with blue polybushes on the front of the Herald as I figured ‘comfort’ more appropriate for what is effectively a late 50s saloon!
Having said that I did toy with the idea of fitting a lowering block, just half an inch, at the back.
Karl
-
They definitely needed doing as the rubber had gone all spongy and started to deform.
The aim is to replace all of the rear bushes with polybushes, however I notice that the polybushes for the rear diff mounts don’t come with an outer sleeve.
Does this mean they don’t need one, or is the expectation that you re-use the old ones, which could be an issue in my case!
At least the spot blaster turned up today, so hopefully I might get to play with it either later today or tomorrow.
Karl
-
So much for getting any welding done on Friday, or anything else for that matter as I ended up having to work, which was a bummer, and not very popular with the household authorities!
Yesterday I ended up going into Oxford with Mrs B, so no work done then either, which just left today to actually get some work done.
Now the plan for today was to finish cleaning the diff up, and draining it of oil, ahead of applying a coat of rust stabilizer.
Now as we all know, no plan survives contact with reality, particularly when that reality involves a 50 year old Triumph!
Draining the diff was the easy bit, followed up by further clean up with Gunk and a selection of brushes and scrapers.
With that out of the way, I thought I'd remove the diff rear mounting bushes, how difficult can that be?
The first central steel tube came out with a few whacks of the hammer, however that is where the 'easy' stopped.
I was going to use my usual technique with washers, studding and sockets as per the set up below:
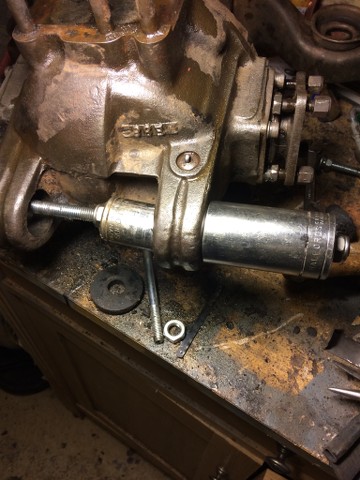
Slight problem, I couldn't find my usual selection of studding, I've put it away somewhere very safe, so safe I can't find it!
Cue hunting through the garage for another length of studding, which I finally found as a left over from when I used it for the rear over riders, however the ends were a bit chewed up where they had been cut with an angle grinder.
Thankfully Santa had given me a tap & die set for Xmas, which was swiftly applied to the studding, rendering it fit for use once again.
Thank you Santa!
As you've probably already guessed, it didn't work, the socket just buried itself in the rubber, and didn't cause the outer metal sleeve to move a millimetre!
Time to carve out the rubber, and break out the junior hacksaw.
Rubber duly removed.
Hacksaw time.
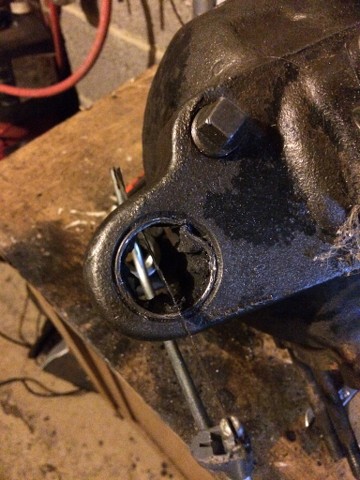
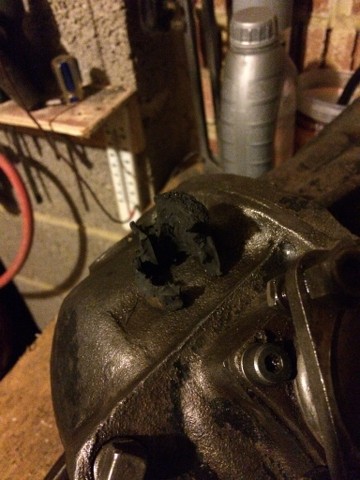
I cut a slot into the collar with the hacksaw, being careful not to cut into the differential casting, before attacking it with a screwdriver and a hammer.
I ended up snapping one of my oldest screwdrivers trying to get this git out.
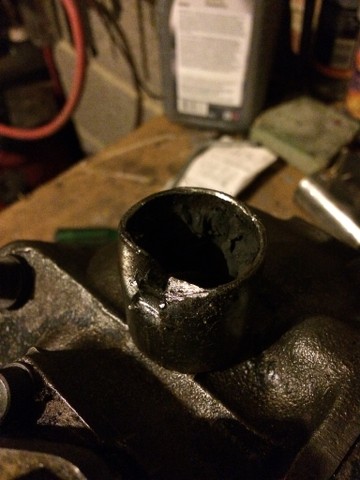
It did come flying out when the corrosion finally relinquished it's grip, and the collar went flying across the garage, leaving me with one unobstructed hole at least!
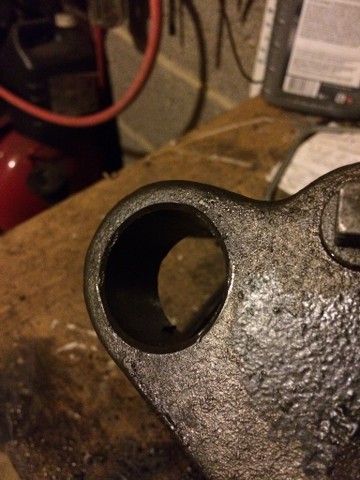
I then started on the other side, running into exactly the same issues, so the diff is now sitting on the bench awaiting another bout of hacksaw work.
I did also do a bit of clean up on the rear of the chassis, but am now waiting on the spot blast gun to get into all the little nooks and crannies around the area of the diff.
Karl
-
I do about 500 miles a week for my commute, mainly M40/M25 and every day see people stranded on the hard shoulder with a flat waiting for the RAC/AA/Greenflag, and while I appreciate that it is not always safe to change a tire on the hard shoulder, there have been goodly number of occasions where it was but they were either lacking a spare or the knowledge to change a wheel.
It does feel like a retrograde step, and just cheapness on the part of the manufactures, however bizarrely my cheap as chips Citroen C1 comes with a full size spare! Go figure!
Karl
-
Spot blaster gun and bearing/hub puller ordered from MachineMart today, supposedly turning up New Year’s Eve.
We shall see.....
In the interim I suppose I ought to do a bit of welding with my new welding apron.
Karl
-
Having had Mrs B have a puncture in the Peak District in her new Citroen C3 sans spare tyre, with just squirty stuff and a compressor absolutely useless!
By the time that most people have sussed they’ve got a flat on a modern it’s too late, too much damage had been done for the repair foam to work.
All our cars now have a spare fitted, even if I have to go out and by one.
Karl
-
 1
1
-
-
Mrs B has told me I am only allowed to wear it in the garage and in concert with overalls!
So no apron and pants when it gets hot in the summer!
Karl
-
I did have a look in Lidl before Xmas but they were out of the blast guns unfortunately, and not sure when I’ll get back to another Lidl, so it may have to be order to Machine Mart instead.
Having said that, Santa did bring me a welding apron, a mains portable lamp, and a set of taps an dies, so I think the Herald has done well this year.
Karl
-
Also worth checking for corrosion around the front of the foot wells where the bulkhead mounts to the chassis.
I found some fairly substantial holes in mine which would probably have leaked like a sieve when driven through a puddles or on a wet road.
Karl
-
1
-
-
I just see the state of the garage after attacking the chassis with a pressure washer and a load of sand!
Bournemouth would have nothing on it!
I’ll have to see what Santa brings.
Karl
-
You can tell it's getting close to Christmas because I'm getting even less time in the garage, having had to drive up to Lancashire yesterday to pick up youngest son from university in Ormskirk.
Today was then spent recovering from a truly horrible drive, both due to the weather, which was foul, and having to use the M6, which is dire in any conditions, so I only got a couple of hours in the sanctuary/garage this afternoon, which ruled out anything particularly involved like bodywork welding.
Therefore I thought I would start cleaning up the areas of the chassis exposed with the removal of the diff last week, cue a selection of wire brushes, motorised wire brushes, both with drill and angle grinder attached.
Not very exciting, but once I have got this out of the way, I can think about priming the chassis with epoxy mastic.
I seemed to end up focussing on the driver's side, for no better reason that that is where all the tools were!
As you can see the back end of the chassis is in very good condition, no doubt as a result of the liberal application of under-seal which is now peeling off alarmingly.
Excuse the crap pic, but it's dark in the garage, and this is the only pic which adequately illustrates the clean up that I will need to do in the rear diff mounts.
So looking forward to that!
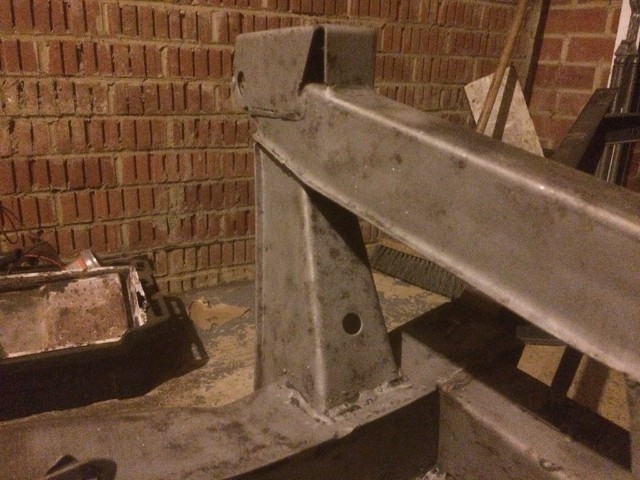
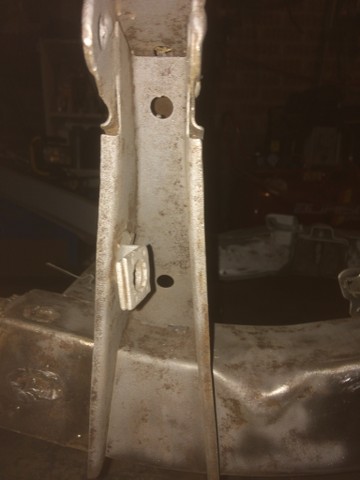
Equally fun have been the rear suspension uprights, well truthfully, just the driver's side one, as I haven't touched the passenger side one yet.

Again a bit of a crap picture, but it shows that it's all in remarkably good shape, however that's the easy bit to clean up, the inside, not so much.
This is after attack with a variety of tools, and is a great example of where media blasting would perhaps be the better solution. Oh well, I’ll have to wait and see what Mrs B has got me for Xmas. Failing that I may be in the market for a cheapie blast gun, which would prove useful for keying the chassis ahead of applying the epoxy mastic.
Like I said, not a very exciting update, but nice to be getting close to a fully cleaned up chassis.
Karl


** 26/02/23 Heading Up ** Probably how not to restore a Herald!
in My Triumph Restoration Project
Posted
I have no idea as there’s are only a couple of little drainage holes on the bottom of the rail, but obviously just big enough to let leaves and crud in, but not out!
Maybe Tony’s right, they came from the leaf spring!
Karl