

Bordfunker
-
Posts
1,005 -
Joined
-
Last visited
-
Days Won
17
Content Type
Profiles
Forums
Blogs
Gallery
Downloads
Store
Events
Posts posted by Bordfunker
-
-
5 hours ago, Colin Lindsay said:
That reminds me of when I had a Reliant Scimitar, to work on the wiring under the dashboard I used to lie upside down in the driver's seat with my feet over the headrest and my shoulders in the footwell. Anything I dropped or unscrewed used to hit me in the face. To get out you just rolled sideways, unless the door had closed in which case there was no chance of reaching the door handle and I just had to shout for help.
That’s the same approach I adopt when working on the Herald’s dashboard wiring!
Thank goodness the car is in a garage and no one can see me!
Karl
-
With life slowly returning to normal after Xmas, I got an afternoon in the garage today, having first chopped the Xmas tree and consigned it to the recycling bin!
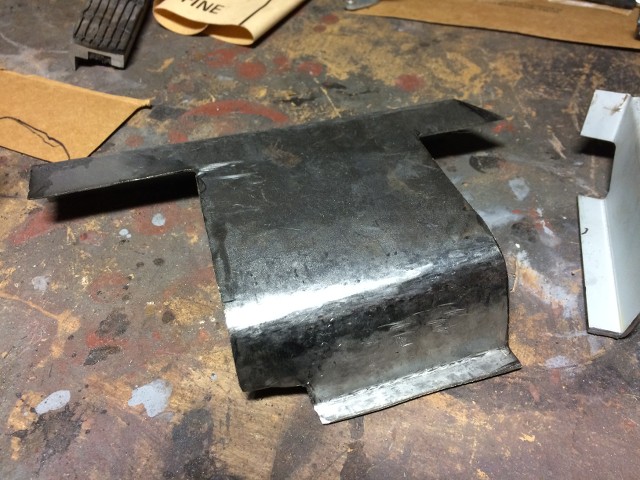
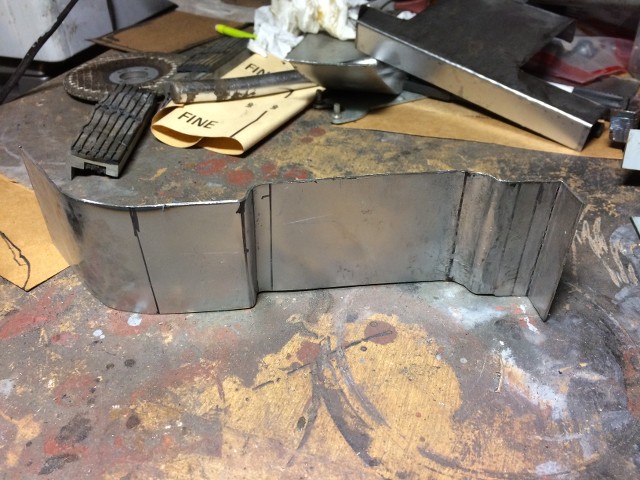
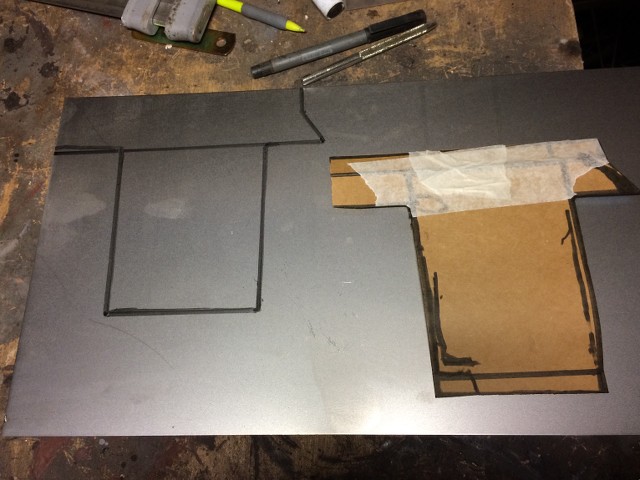
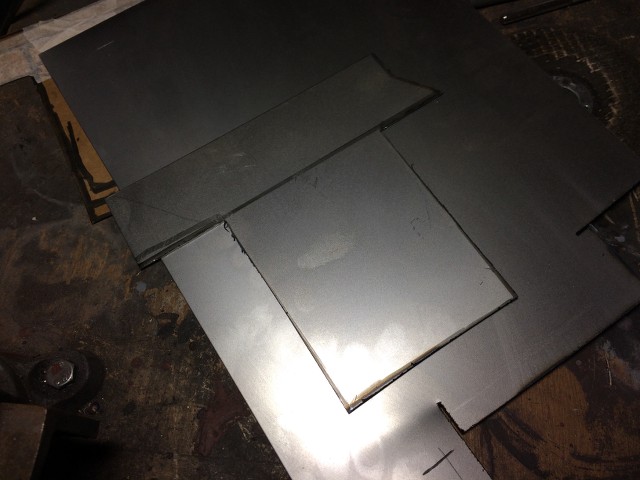
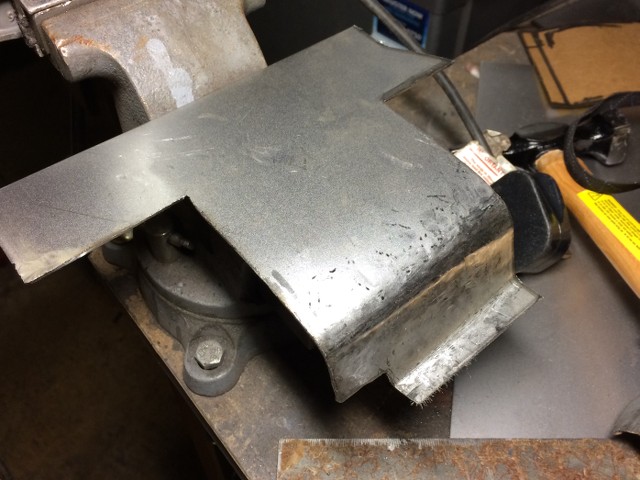
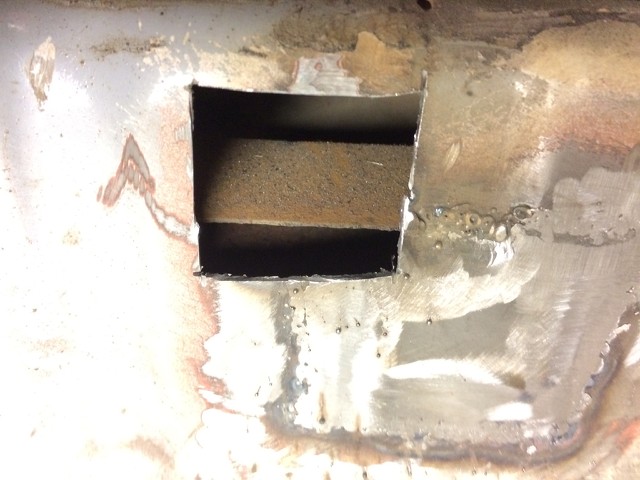
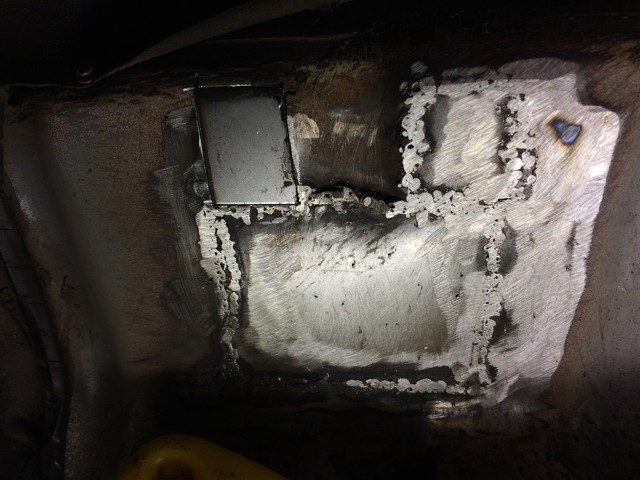
Last week I left the main patch for the passenger side footwell with the inner curve and lip formed, but with more work to do to tidy up the fit and create the outer lip to which the sill is attached.
This meant an hour and half of offering the new part up, checking the fit, and tweaking the panel, before repeating, over and over again, which left me with this.
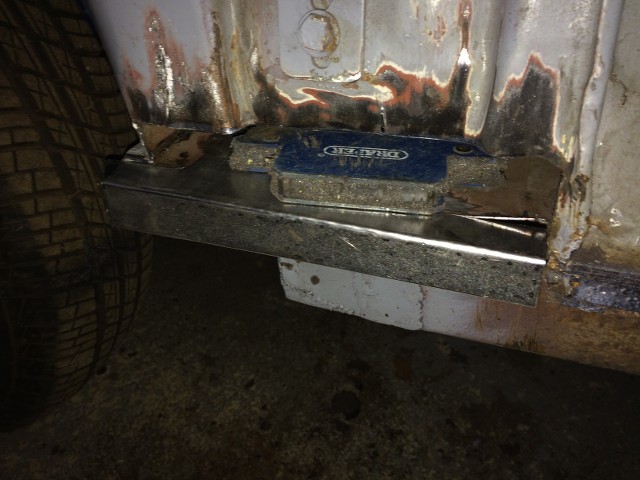
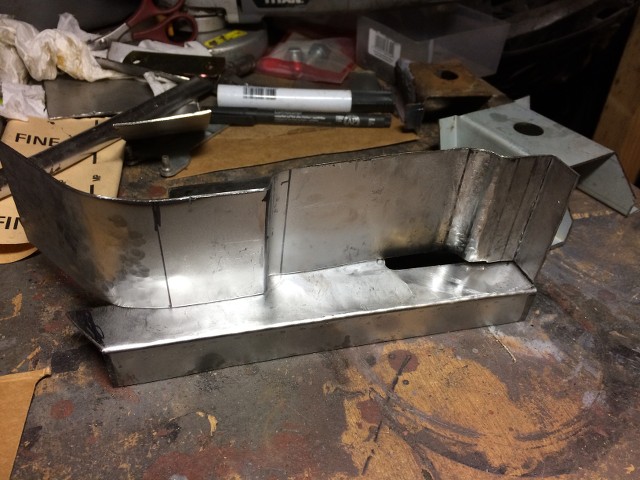
And showing the sill mounting lip.
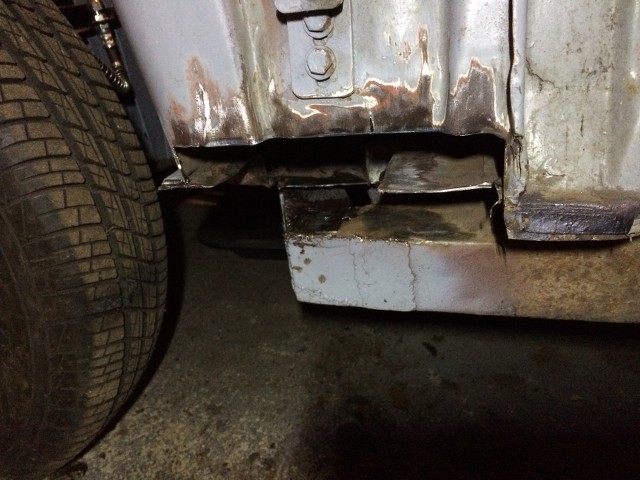
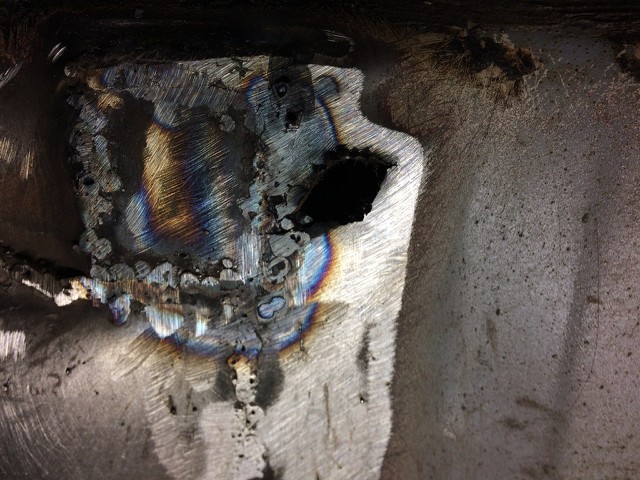
Here it is installed....
...and from outside of the car.
Overall I am pretty chuffed with how that has turned out. The fit is good all round, and it mimics the contours of the original panel pretty closely.
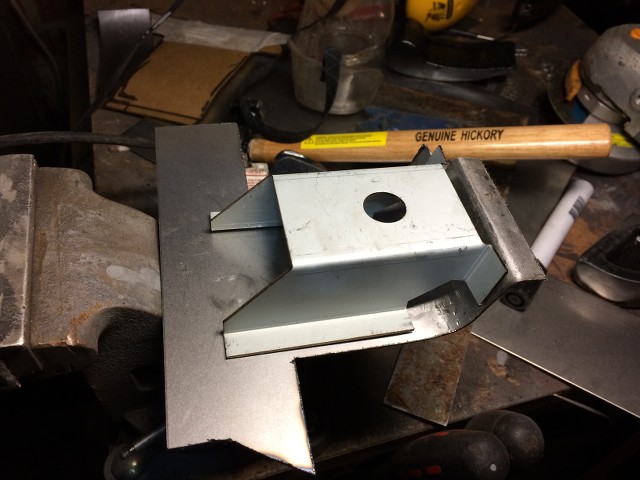
The replacement mounting bracket is a generic item and thus needs to be modified to fit this particular location on the Herald, so I cleaned up the old mount and used this as a template to cut a small portion off the new bracket.
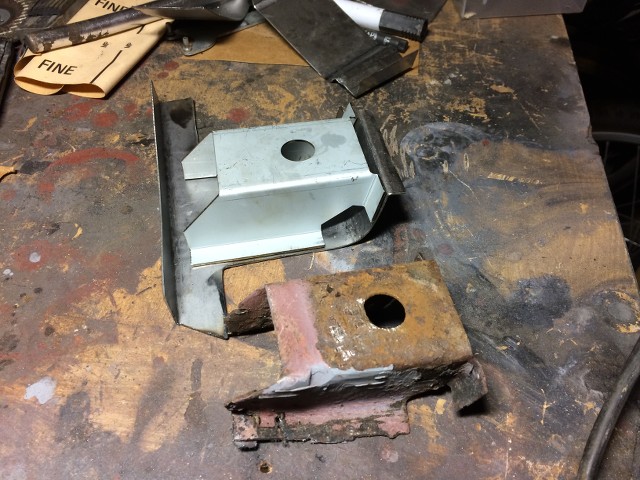
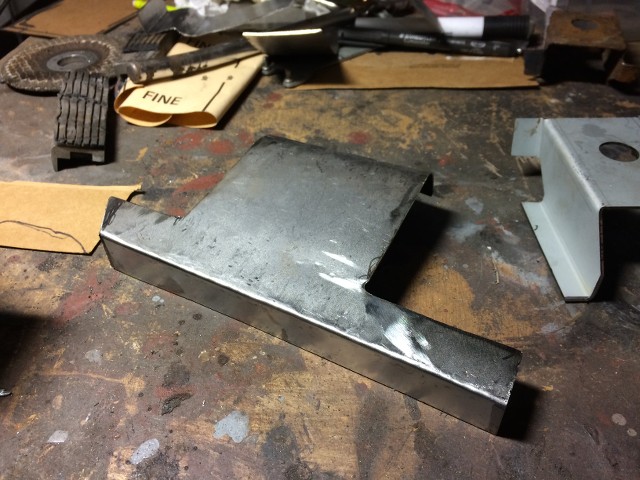
Next up was to make a replacement section for the side lower bulkhead that I cut away last week, a much simpler task than the main repair section.
And this is how it relates to the previously fabricated section.
It will need cutting down to fit, but the shape is a good match, which means I now have all the sections I need.
Before I do that though I'm be switching to welding with gas, rather than the gasless set up I've been using for the last 8 months, as with the welding focus shifting to visible areas of bodywork, I'm not convinced that gasless will be neat enough, so there may be a break for a few weeks while I practise my welding.
Karl
-
Pete, that does make mine sound almost mint!
Well after 2 weeks where work and Xmas have taken precedent in that order, I finally managed to get back in the garage on New Year's Day for a couple of hours.
I finally fitted the seatbelt reinforcing plates, making sure that these were first painted with primer, and then sealed with seam sealant to prevent them rusting from the inside out in future.
No pictures, but they are not very exciting anyway.
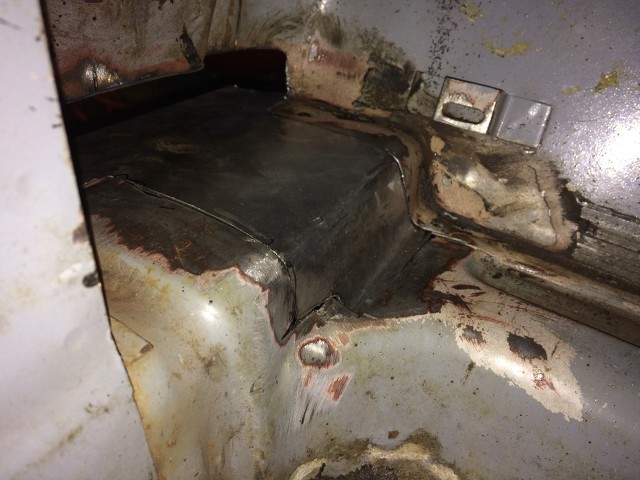
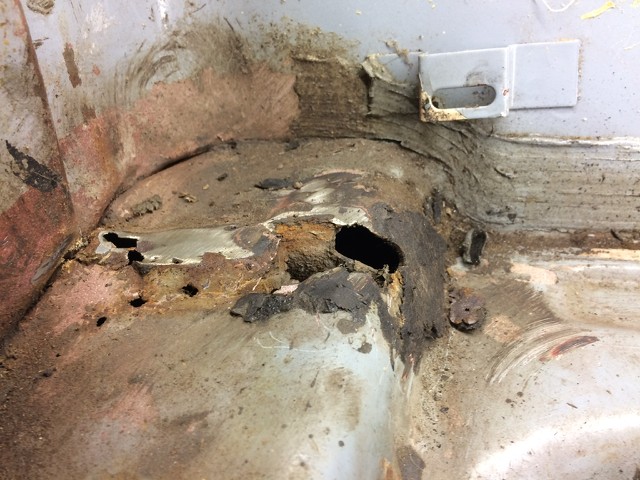
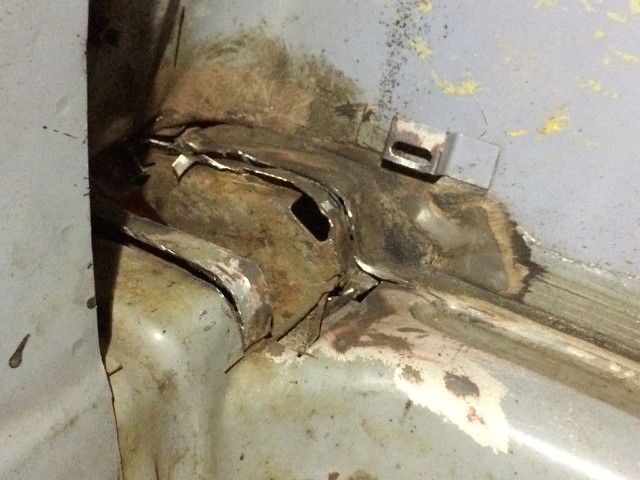
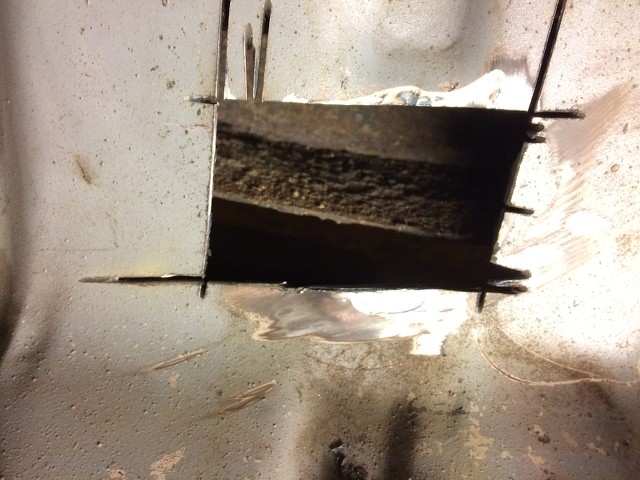
With those done, it was time to turn my attention to the passenger footwell, and cut out all of the rot.
This meant removing the section of floor, as well as the retaining bracket which ties the shell to the chassis, along with a chunk of the scuttle panel behind the bonnet, leaving me with this.
Not pretty, but at least I know I am back to decent metal that I can weld to.
This revealed that whoever replaced the side rail last time only bothered to weld the side and bottom, not the top.
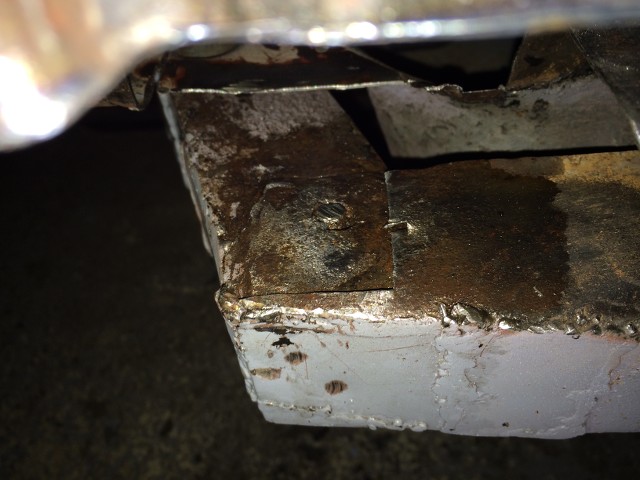
They didn't even bother removing the remains of the original rail!!!
So one of the first things I will have to do is weld the two together so that at least it's all fully attached.
Does make me wonder what state the rest of the joints are in, and means I'm more inclined to remove the shell from the chassis next winter so that I can properly sort both.
You can also see the remains of the body mounting bolt in the picture above, which had to be cut and ground out, and has still left the shaft of the bolt stuck in the hole.
Needless to say this is now marinading in penetrating fluid, before I attack it with a drift and a lump hammer.
Next up was making a template out of card for the repair panel which is going to have to mimick the curvature of the floor on the inside, and the sill mounting lip on the outside.
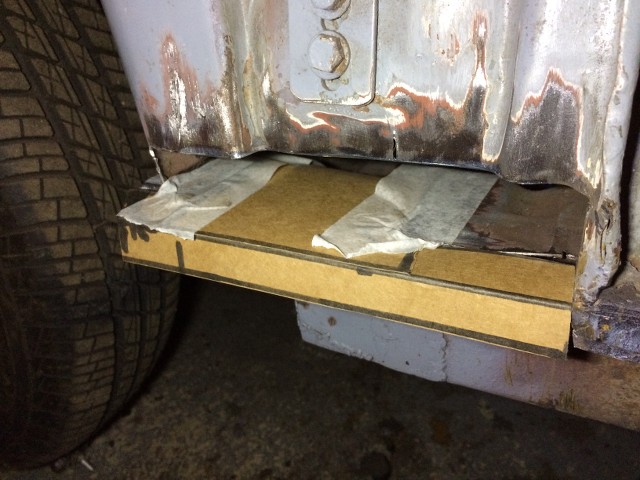
This was then flattened out and transferred to a sheet of 1mm steel.
Rapidly followed by 20 minutes of cutting with a 1mm disc in the angle grinder.
There then followed 2 hours of work to start forming the curve, and the lip required to match the profile of the floor.
Rather fortuitously Santa delivered a hammer and dolly set, which have proved immensely helpful in forming the curve so far.
Here it is with the new mounting bracket sitting on it.
The bracket will need shortening as it is longer than the original, but nothing that 10 minutes with an angle grinder can't achieve.
Yesterday evening I had a go at recovering the driver's seat, and fitting the new foam, however someone else had need of my seat!
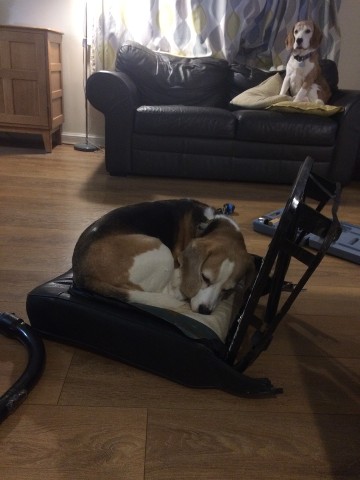
Beagles, worse than cats for sitting on stuff.
Karl
-
 1
1
-
-
No just someone who doesn’t read so well!!!!!!
Karl
-
 1
1
-
-
If memory serves the phrase ‘pot to piss in’ relates to the fact that poor used to take their urine to the local tanners for use in the leather tanning process, and in the process were paid.
The really poor couldn’t afford a pot, and therefore couldn’t take their urine to the tanners, and didn’t get paid.
Karl
-
That’s what you get for living in West Drayton!
Karl
-
1
-
-
Despite preparations for Xmas taking precedent at the moment I managed to get some time in the garage over the weekend, working on the seat belt mounts.
I suppose I could have just slapped a patch over the rot and moved swiftly on, but that would have felt like a bodge, and would only have come back to bite me a later date, so instead I've gone belt and braces (excuse the pun!), and fitted internal reinforcement plates as well as external.
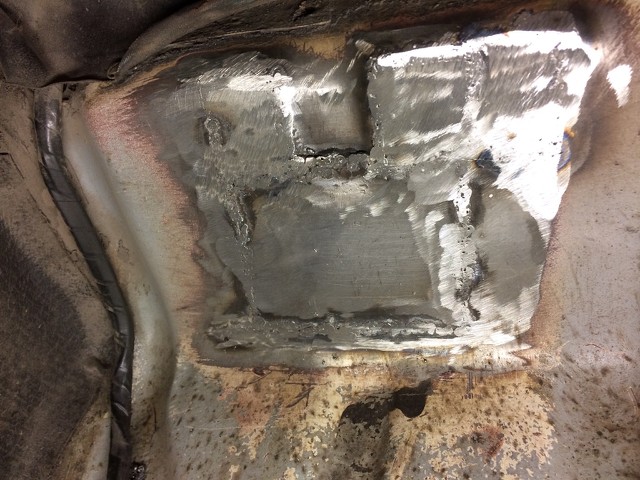
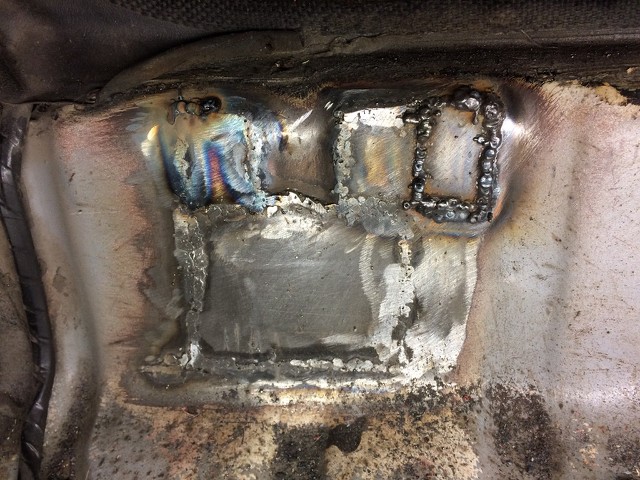
Here's where I was yesterday with the side wall of the footwell welded up, and marked up ready for me to drill the hole for the mounting bolt.
The welding isn't particularly pretty, even after the attentions of a grinder and flap, disc, but I know it's bloody strong as even attach with a centre punch and a lump hammer produced no deflection.
With the hole marked and drilled I created an internal reinforcement plate from 2mm sheet steel, which was coated in weld through primer, along with the footwell patch and allowed to dry off overnight as paint takes an age to dry in this weather.
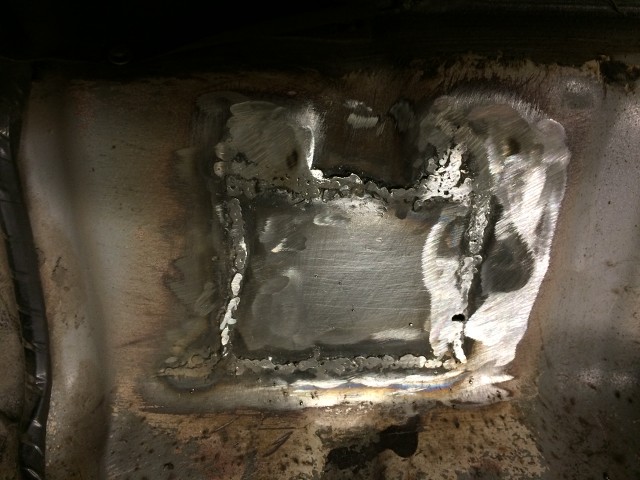
The patch was then shaped to follow the contours of the panel and welded in place.
Again, not exactly a work of the welder's art, but it should be plenty strong enough now.
I then cleaned up the metal on the outside of each well with wire brushes and a power drill, before applying a coat of Kurust to ensure that the rust stays at bay.
Once this has dried off it will get a coat of weld through primer, before the external reinforcement plate gets fitted, along with plenty of seam sealant to ensure this doesn't happen again, well at least not for a long time.
Following last month's smouldering cable incident, I took the precaution of fitting a Dis-Car-Nect from the club shop.
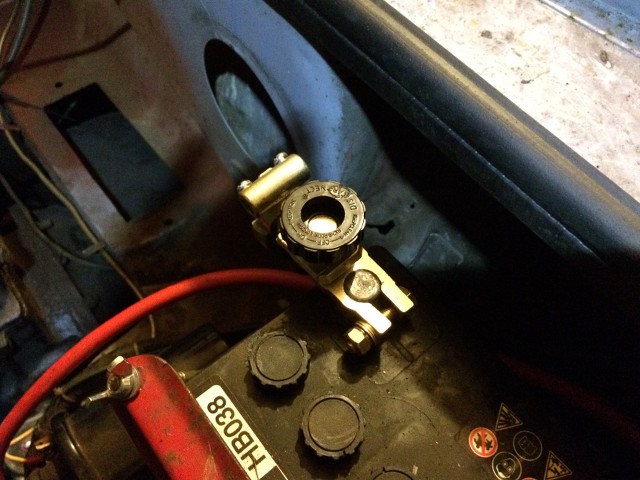
This will save me unhooking the battery after ever session.
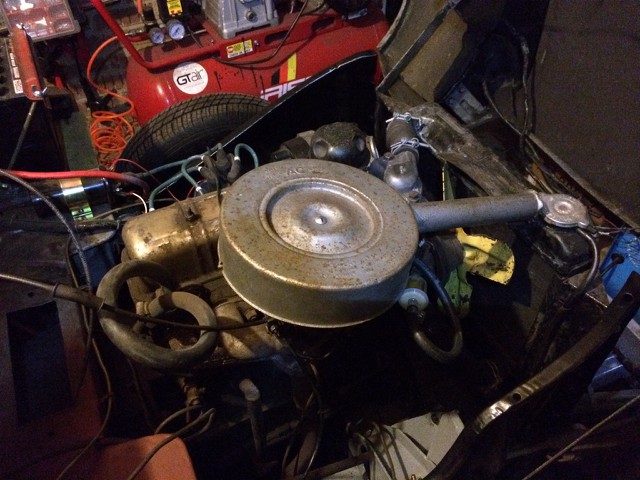
And while the bonnet was up I took the opportunity to re-fit the air filter, after sorting out the mounting flange and clamp, so that it actually fits securely now.
With the seat belt mounts all but sorted, you'd think it would be time to put the MIG welder away?
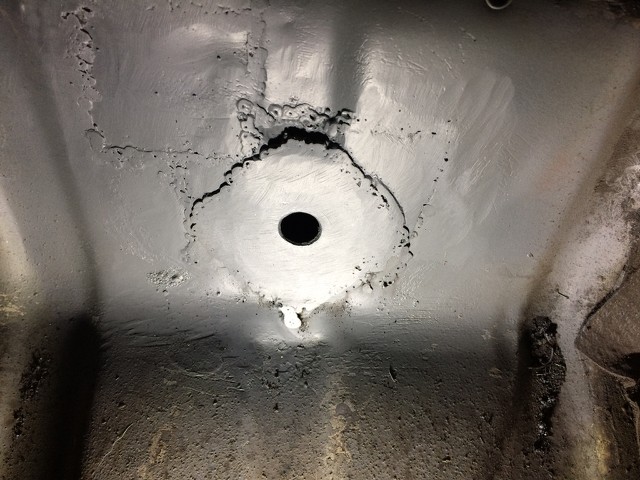
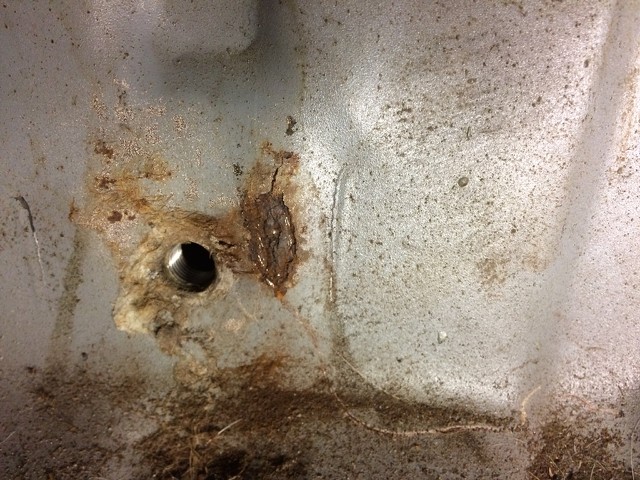
Wrong, I spotted a couple of tiny holes in the passenger footwell, which I decided to investigate with a screwdriver.......
.....Oh dear! Or words to that effect!
A couple of minutes with a wire brush in the angle grinder produced this.

The body to chassis mount was chock full of mud and general road detritus, and had simply rotted through the floor, not helped by the fact that the passenger side had received a hefty whack at some point in the past making a mess of the sill mounting flange, and allowing water to penetrate between the double skinned joint. All of which was not helped by a felt pad glued to the floor at this point which has acted like a sponge!
Nothing for it but to break out the angle grinder and air powered cutter and start cutting back to good metal.
Not a great photo, but that's the chassis mounting bracket you can see, along with some of the distortion from a previous accident which has damaged the floor and bulkhead at this point.
Due to the location, I had to resort to an old wood chisel and lump hammer, which made short work of slicing back to the outer skin of the bulkhead.
I had been intending to sort out the sill mounting at some point, so it's not a great shock, but will mean a few more sessions fettling repair panels from sheet steel and much welding, hunched up in the footwell.
I think I know what my New Year has in store for me!
Karl
-
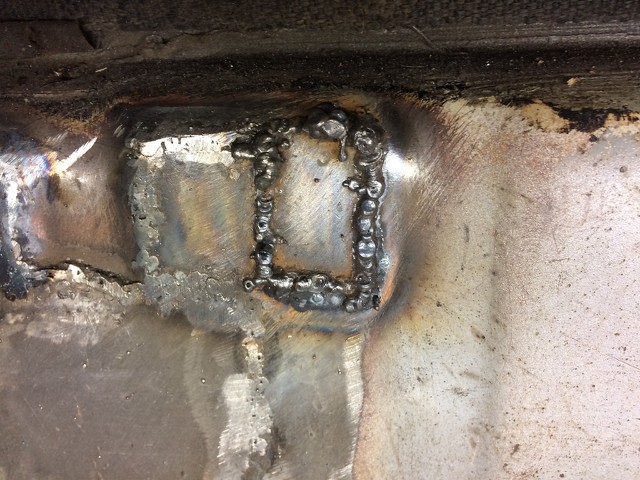
Despite the weather, I decided to press on with the welding on the passenger side seat belt mount, sorting out any pin holes, and grinding back the welds to something vaguely neat and tidy.
This then got a coat of weld through primer, before application of an internal reinforcement patch, here it is held in place prior to welding up.
There is a corresponding reinforcing plate on the outside of the panel, which should make for a suitably robust seatbelt mount.
Before I drilled the new mounting hole, I took a look at the mount on the driver's side for reference, I wish I hadn't!
Like the passenger side, rot had got in between the reinforcing plate and the panel itself, leaving the panel paper thin!
Nothing for it but to break out the grinder and a cutting disc again.
Here we are with the main patch already welded in, but having to cut out a further patch to deal with the thinner corroded metal where the panel has been stretched when it was pressed.
I did manage to get a patch in place on this before I finally gave up this afternoon as the garage was down to about 2 degrees as a result of having to leave the door open.
So I figure at least another session of welding & fettling before I can call the seat belt mounts done, but at least I know that the mounts are now at least solid!
Karl
-
The replacement horn from Paddocks turned up this week, so that took all of 2 minutes to fit, so that I now have melodious horn functions!
That was the easy bit this weekend, as attention then had to turn to the rot around the seatbelt mount.
Moisture has obviously become trapped between the reinforcing plate and the rear foot well, leading to this over time, where the rot has actually broken through.
Nothing for it but to break out the angle grinder and cut out the offending metal, leaving me with this this.
This was my first attempt, made last Sunday. When it came to welding in the patch it just kept blowing through as the old metal of the foot well was too thin, so I ended up cutting it out and starting again with a larger patch.
Better, but still no cigar, as the top join kept blowing through, necessitating the use of two smaller patches either side of the reinforcing rib.
The patch on the top right has already been welded in and ground down, while the new patch is just sitting in position awaiting welding.
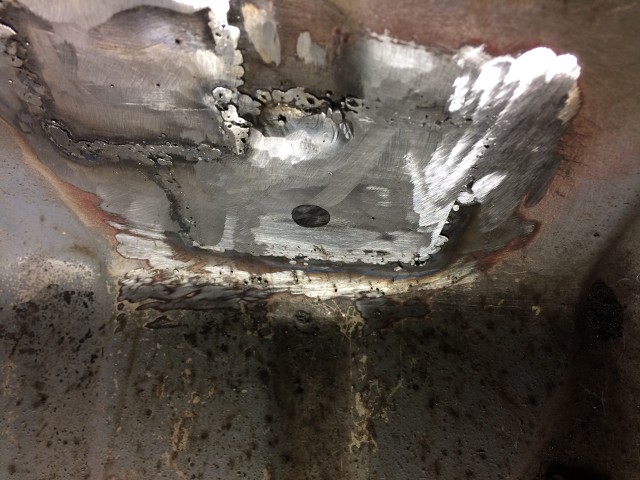
And here it is welded in. Job done?

To be on the safe side I welded the joints from both sides, and it was while doing that I heard an ominous crack!
The metal to the right of the right hand patch had just cracked as it cooled, so thin was the old metal.
I did consider welding the crack, but a firm jab with a screwdriver produced this!
Nothing for it but to cut out and weld in another patch.
Not pretty at the moment, but like the other patches welded on both sides for strength prior to being ground down.
Clean up will have to wait for next weekend, as I ran out of time today.
Once I've marked out where the hole for the seat belt mounting should go, I'll weld in an additional reinforcing patch on the inside of the car, before fitting the external plate I've ordered from Paddocks.
Not bad for three hours work, but quite frustrating all the same, as I thought the bulk of the welding was behind me for now.
Karl
-
During WWII military aircraft regularly diverted cooled axhaust fumes into the fuel tanks as they emptied, thus preventing an explosion in the event of the tank being hit by flak.
So not such a red kneck solution.
Karl
-
Funnily enough I was looking for a tool for tightening bezels up the other week, and they are about £25 a pop, so this is a great money saver.
Karl
-
This popped up on another forum I frequent.
Does anyone know if this is a club car?
God only knows what will happen to it if it gets towed.
Karl
-
1
-
-
Pete, thanks for confirming that.
That means I can crack on with welding in the repair section that I made up last night.
I’m inclined to order some new reinforcing plates, but will see what I can do with the old plate and the spare that fell out of the sill.
Doug, you are right, the statics are more comfortable, but I think they look ugly compared to the period statics I’ve got.
Time to break out the MIG!
Karl
-
Thanks for the comments guys.
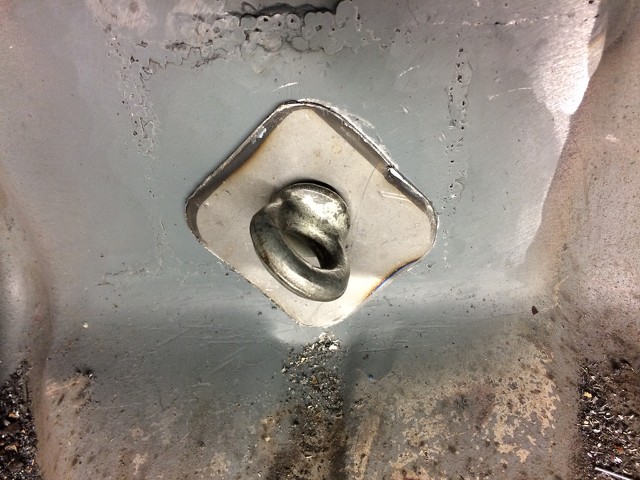
At the moment I am unsure whether the reinforcing plate I removed yesterday was a factory fit, or a new addition when the inertia’s were fitted.
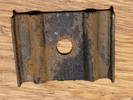
I did find this lurking in the driver’s side sill a while back, which looks like it may be the original reinforcing plate for the statics on that side. If so it looks like they weren’t welded in.
Unfortunately my WSM predates the fitting of seatbelts so isn’t a reliable reference point, so I can’t tell whether I can just weld up the hole in the flor today, and then fit the new reinforcing plate next week without having to break out the welder again.
With regard the inertia’s fitted when I got the car, their operation also seemed very hit and miss, despite much tinkering, so I decided to refit the original passenger side static on the driver’s side, and get the frayed driver’s belt rebuilt by Quickfit in North London.
I must admit I much prefer the look of the statics over modern inertia reel belts.
Karl
-
I stumbled across this site this evening while looking for information on seat belt reinforcing plates.
https://mattersoftesting.blog.gov.uk/category/horror-stories/
Truly terrifying bodges!
Karl
-
1
-
-
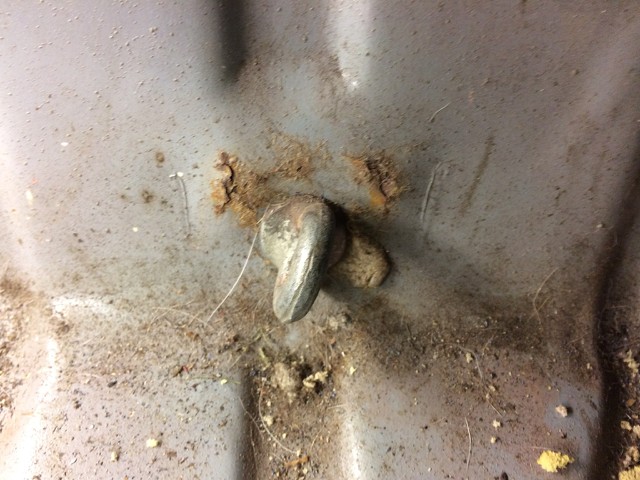
As part of my prepping the Herald for its MoT I went to fit the newly refurbished passenger side seat belt, and having removed the inertia reel belt, which doesn’t seem to work worth a damn, noticed that there was corrosion around the lower mounting point.

Having cut out the metal around the mounting, including the reinforcing plate behind the panel itself, I am trying to work out if the reinforcing plate is welded to the panel, or is it simply held in place by the seat belt bolt?
Welding isn’t an issue, but I’ll need to weld the reinforcing panel to the repair section before I weld that as it’s all hidden behind the side rail, which will mean waiting another week while the reinforcing plates turn up and I get an opportunity to weld.
Karl
-
Wish Mrs W all the best, and I hope she gets better soon.
Karl
-
I get the Saab approach as this mirrors aviation practise where often at night only the blind flying panel, where all the useful instruments are located, is illuminated to aid pilot focus.
I did think about changing the positions as per Pete’s suggestion, but then I would be the one driving around with an illuminated speedo and no external lights, because I hadn’t pulled the switch all the way out.
The new horns turned up from Paddocks, but the high note one had been damaged in the post, probably because it had been sent just in the Lucas box with no external packing!
I still fitted the low tone horn, and gave it a quick toot!
Karl
-
Colin, you were lucky you weren’t gassed.
Karl
-
I’ve just dug the handbook out that came with the car, and low and behold it’s supposed to work that way!
If it’s dark enough outside to need to turn your exterior lights on, then surely it’s dark enough inside the car to require dashboard illumination?
I’ve had French cars for the last 15 years, and even they haven’t been that odd.
Karl
-
Doug, you’re really selling me on the tap idea.........
I had another look at the speedo illumination last night, and realised that the master light switch appears to have 2 positions.
The first turns on the exterior lights, then a further pull engages a second position which turns on the speedo lights.
You learn something new everyday with a Triumph.
Karl
-
Darren, I think I may well add a second filter just after the tank, after all I’ve got plenty of new fuel hose left, and as you pointed out would prevent muck getting into the pump.
Anglefire, I must admit I never had an issue with the Beetle, apart from the fact the fuel gauge didn’t work, which lead to fuel starvation of a different nature!
Karl
-
It's been a bit of a two steps forward, one step back weekend, with major progress on the brake and clutch hydraulics, but also a narrowly avoided disaster.
First up the disaster bit.
I was putting the gearbox tunnel cover back last night, when the car suddenly started to fill with smoke!!!!!!
A quick look around identified the culprit, the driver's door courtesy light wiring which was bubbling before my eyes and emitting clouds of smoke.
Quick as a flash I pulled the leads off the battery, and opened the garage doors, to let the smoke disperse as rapidly as possible, and grabbed the fire extinguisher just in case.
I let everything cool, down as well as my heart rate calm down to a more normal level.
A thorough inspection revealed that damage was limited to the courtesy lighting circuit, with the driver's side completely fried, and the wiring to the interior light switch and master light switch all in a similar state.
To make sure I had a full picture of the damage, meant dropping the dash out as much as I physically could, leaving me with this.
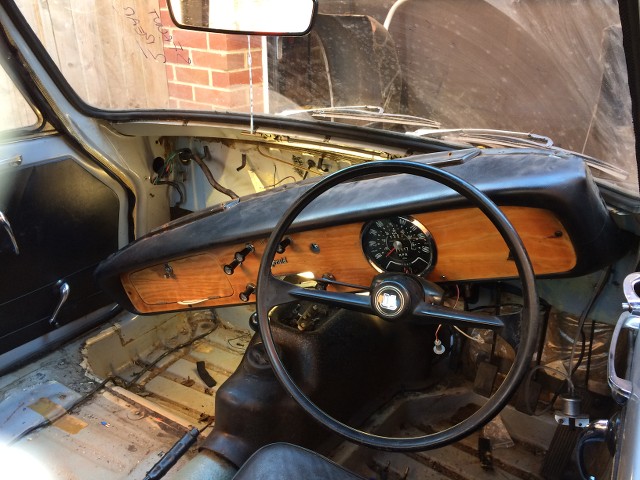
It may seem a bit drastic, but I wanted to appreciate the full extent of any damage to the main loom itself, which also entailed slitting the binding on the loom to check the condition of the wires within.
Thankfully the main loom was in perfect condition, with all damage limited to the courtesy light circuit.
Here are the remnants of the courtesy light wiring after removal, along with some of the removed dash components.
I haven't put the driver's seat back together yet, but have simply swapped the passenger side seat over to allow me test drive the car up and down the drive, or that was the intention before the smoky hiatus.
I have now rebuilt the wiring to the interior light so that it operates off the passenger door, and via the central switch, but I'll need to take a look at the remains of the switch on the driver's side and see if I can reinstate that another day.
I've also got an issue with intermittent lighting on the speedo, which is why I spent over an hour upside down under the dash yesterday, something which influenced my decision to remove the dash, rather than tackling it from underneath.
One of the bulbs has blown, so should be a simple replacement, while the other works intermittently.
All the other bulbs on the speedo, high beam, ignition, work perfectly, so I don't think it's an earthing issue, but haven't done a multi-metre test yet, so it could be as simple an issue with the switch itself.
As well as lighting issues, I was also trying to sort out the non-functioning horns.
As per Badwolf's advice, I hooked both horns up to the battery to test them.
The Hella barked into life, but is past saving as one of the connector tabs has snapped off, but the Hooters wind tone one was completely dead.
Next up was a test of the horn circuit itself with the multi-metre, which confirmed everything was working as it should.
Therefore I'm in the market for two new horns, as I can't be arsed to try and revive the wind tone horn.
Now the stuff that did go well.
I finally got around to picking up the brake line from the garage, and this time it was the right length, and went in without too much of a struggle.
With that in place it was time to fit the clutch and brake master cylinders and their associated brackets to the bulkhead.
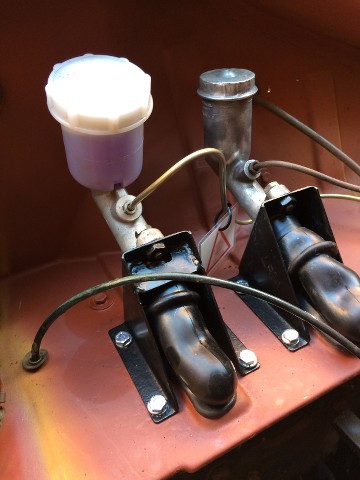
Here they are with fresh bolts and topped up with Ribena!
Note the warning tag advising that both clutch and brake systems are silicone filled.
My youngest son gave me a hand to bleed the brakes and clutch before I dropped him back at university today.
The other job was to sort out the leaking fuel line, so a length of new fuel hose was purchased, along with some hose clips, and in 15 minutes I had this.
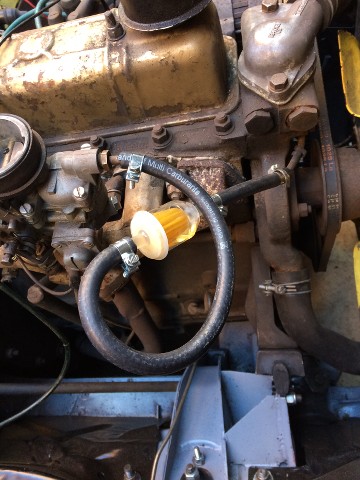
Not pretty, but non-leaking at least!
The rebuilt fuel pump seems to be working with more vigour than it did before, as not only did it cause the old fuel line to leak, but the idle needs to be adjusted as it's too high with the current setting.
Given that nothing else has changed, I can only assume that the pump is now pushing more fuel through and thus upping the idle speed, but sorting that will have to wait until after I've sorted out the electrics.
Finally a shot of my homemade front valance brackets in situ.
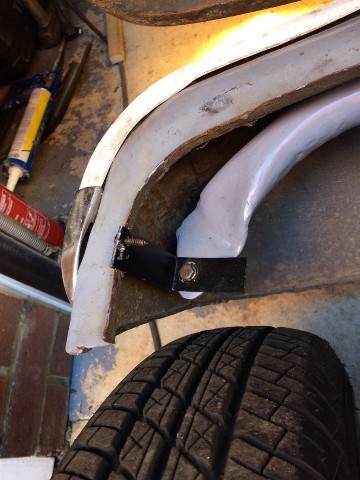
My car hasn't got the seals at either end of the valance, so I cheated and screwed the bracket direct to the top of the valance. One day I'll have to get a new valance, but for now this one will do.
So definitely a mixed weekend, including a drive to Lancashire and back, but definite progress at least.
Karl
-
I’ve been lucky in that I’ve never had an issue with vaporisation on any car I’ve owned, including the Beetle which you would expect to suffer issues, and that used to get driven in heavy traffic around West London on a regular basis.
Still, never having driven the Herald on a hot day in traffic, I haven’t fully explored the Herald’s vaporisation capabilities!
Karl


Lidl Welder 40 - 90amps
in Tools
Posted
I would be inclined to go with a welder that can be used with or without gas, as having welded gasless for the last 9 months I’m now switching to gas as it produces a neater result, particularly on thin steel like bodywork.
I went with a Clarke 151 EN as it can handle both gas and gasless, and has enough grunt to deal with metal up to 6mm, as despite what they claim, most smaller machines can’t achieve decent weld penetration on anything over 2-3mm.
Karl